Multiple Certificate support in Weblogic 12.2
CONNECT is not yet intended for multi-exchange support
The ability to download, store and process data from multiple healthcare provider directories and the proof of concept to authenticate with multiple certificates on one CONNECT instance have been completed with the release of CONNECT 5.3. However, the messaging and SAML services are still strictly intended for NwHIN exchange. Additional code enhancements are required for complete multi-exchange implementation.
Setting up Apache HTTP Server
Instructions to set up the Apache HTTP Server can be found here. Setup remains the same for configuring multiple exchanges under multiple host names. The Apache HTTP server will serve as a proxy to bind the different virtual hosts to individual ports on WebLogic. In the setup defined here, we will be using Apache HTTP to serve as a front facing server to host two different domains which point to the same WebLogic Server.
Installing Weblogic 12.2
Download weblogic binary (http://www.oracle.com/technetwork/middleware/weblogic/downloads/wls-main-097127.html). In this case, we choose a generic type which includes oracle weblogic server an oracle coherence.
- Unzip the binary under
<weblogic-jar-director> - $
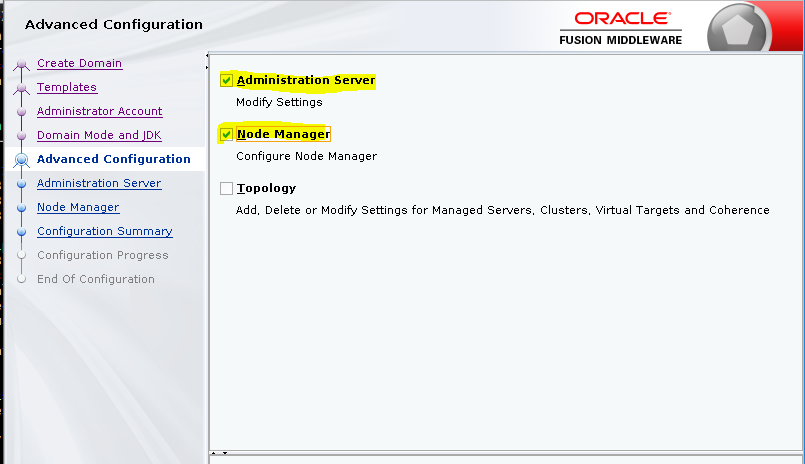
java -jar fmw_12.2.1.2.0_wls.jar - Install a new domain and select Administration Server & Node Manager in Advanced Configuration.
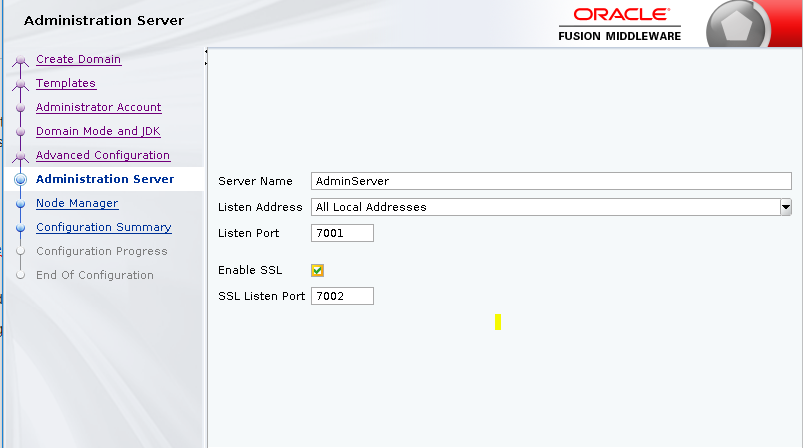
- Set Listen Port to Default 7001 and SSL Listen Port to 7002.
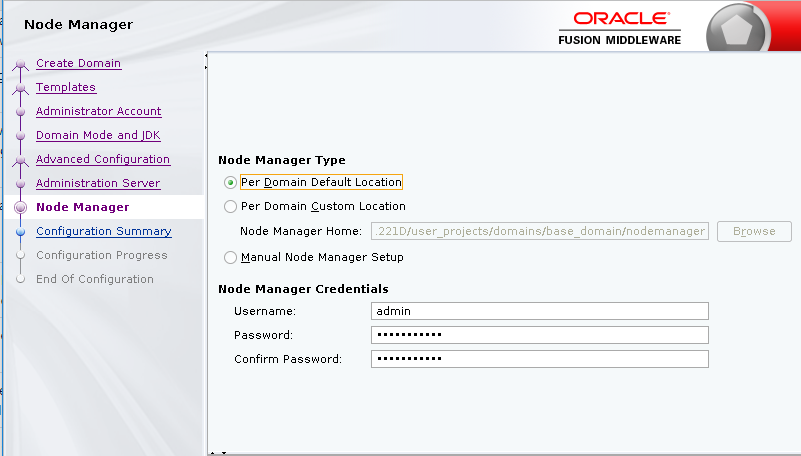
- Assign username and password for Node Manager: admin/adminadmin1, then click create.
- Edit /nhin/server/wls1221c/user_projects/domains/base_domain/bin/setDomainEnv.sh and add:
#note:This is for wherever CONNECT properties has been installed.
EXT_POST_CLASSPATH="/nhin/server/connectProperties"
export EXT_POST_CLASSPATH

CLASSPATH="${CLASSPATH};${EXT_POST_CLASSPATH};"
export CLASSPATH

NHIN_PRO="-Xmx8000m -Dnhinc.properties.dir=${EXT_POST_CLASSPATH} -Djavax.net.ssl.keyStorePassword=changeit -Djavax.net.ssl.trustStorePassword=changeit -Djavax.net.ssl.keyStore=${EXT_POST_CLASSPATH}/gateway.jks -Djavax.net.ssl.keyStoreType=JKS -Djavax.net.ssl.trustStoreType=JKS -Djavax.net.ssl.trustStore=${EXT_POST_CLASSPATH}/cacerts.jks -DCLIENT_KEY_ALIAS=gateway -Djava.security.egd=file:/dev/./urandom -DUseSunHttpHandler=true -Dcom.sun.xml.ws.transport.http.HttpAdapter.dump=true -Dcom.sun.xml.ws.transport.http.client.HttpTransportPipe.dump=true -Djavax.enterprise.resource.xml.webservices.security.level=FINE -Djavax.enterprise.resource.webservices.jaxws=FINE"
export NHIN_PRO

JAVA_OPTIONS="${JAVA_OPTIONS} ${NHIN_PRO}"
export JAVA_OPTIONS
Copy Log4j to \user_projects\domains\base_domain\lib
- wllog4j.jar and log4j-<version>
Start Admin Server
$ /user_projects/domains/base_domain/bin/startWebLogic.sh
Log into Admin Console
http://<ip address>:7001/console- admin/adminadmin1
Create Cluster, Machine & Managed Servers
Under Environment > Clusters > New (select: cluster)
- Name: ClusterNew
- Click: ok.
Under Environment > Machines > New
- Name: Machine1
- Click: Next
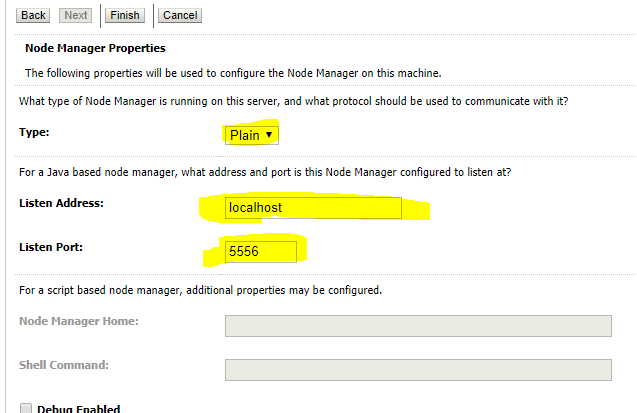
- Type: Plain
- Listen Address: Localhost
- Listen Port: 5556
- Click: Finish
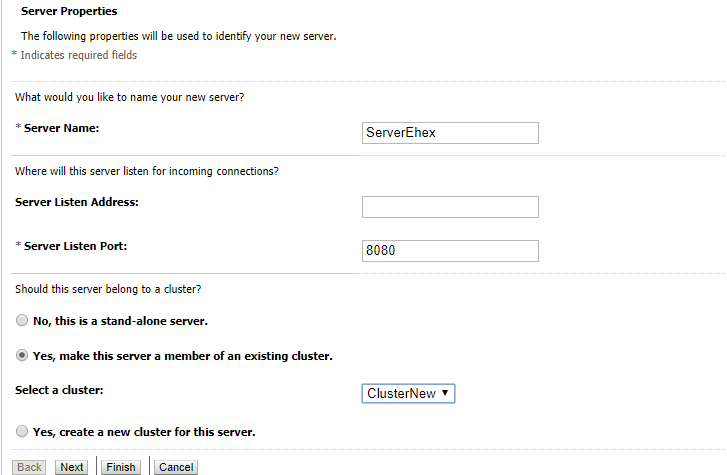
Under Environment > Servers > New
- Server Name: ServerEhex
- Server Listen Port: 8080
- Select:
Yes, make this server a member of an existing cluster - Select a cluster: ClusterNew
- Click Next > Finish.
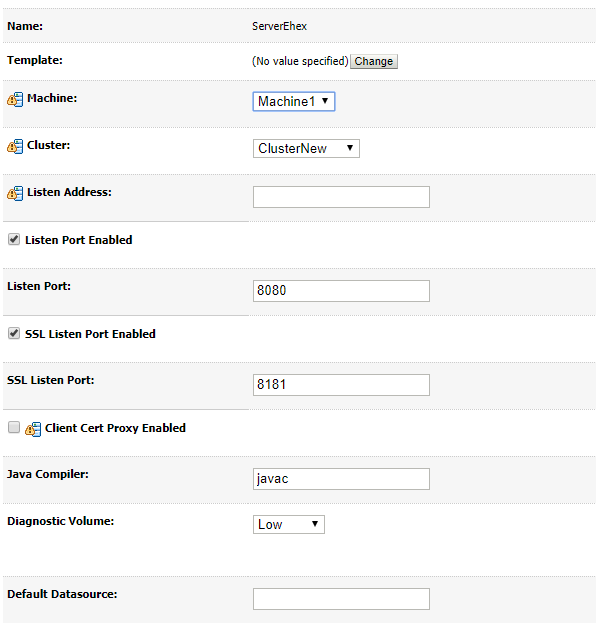
under Server: ServerEhex > Tab: General
- Machine: Machine1
- Cluster: ClusterNew
- Checked: SSL Listen Port Enabled
- Listen Port: 8181
- Click: save
under Server > New
- Server Name: ServerCQ
- Server Listen Port: 9090
- Select: Yes, make this server a member of an existing cluster
- select a cluster: ClusterNew
- Click: Next > Finish
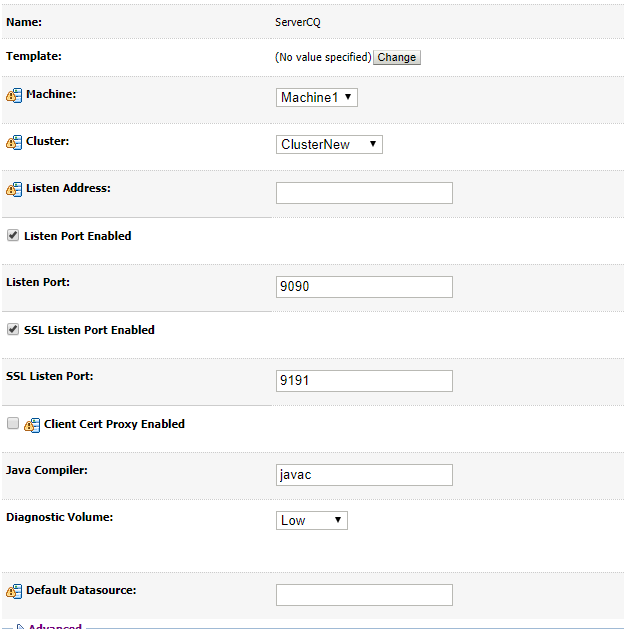
Under Server: ServerCQ > Tab: General
- Machine: Machine1
- Cluster: ClusterNew
- Listen Port: 9090
- Checked: SSL Listen Port Enabled
- SSL Listen Port: 9191
- Click: Save.
Configure Keystores & Truststores
Under Environment > Servers > Admin Server > tab: Keystores
- Keystores: click change
- Select: Custom Identity and Custom Trust
- Click Save
Under tab: Keystores > Identity
- Custom Identity Keystore: <connectProperties>/gateway.jks
- Custom Identity Keystore Type: JKS
- Passphrase (confirm): changeit
Under tab: Keystores > Trust
- Custom Trust Keystore: <connectProperties>/cacerts.jks,
- Custom Trust Keystore Type: JKS
- Passphrase (confirm): changeit
Under Environment > Servers > Admin Server > Tab: SSL
- Click: Advanced
- Identity and Trust Locations: Keystores
- Private Key Alias: gateway
- gateway_b (serverCQ)
- Passphrase (confirm): changeit
- Certificate Location: "from Custom Identity Keystore"
- Trusted Certificate Authorities: "from Custom Trust Keystore"
Under Tab: SSL > advanced
- Two Way Client Cert Behavior: Client Certs Requested and Enforced
- Click Save
Note# repeat this process for ServerCQ and ServerEhex
- Restart the server and verify you can still login successful.
Configure NodeManager
Under Environment > Machines > "Machine1" > Node Manager
Make sure that Plain is selected for type
- Type: Plain
- Copy
/user_projects/domains/base_domain/bin/startNodeManager.shto/user_projects/domains/base_domain/nodemanager/startNodeManager.sh
Edit /user_projects/domains/base_domain/nodemanager/nodemanager.properties. Make sure
ListenAddress=localhost
ListenPort=5556
SecureListener=false
Set the Environment Variables: CLASSPATH and PATH
- Run
/wlserver/server/bin/setWLSEnv.sh
WebLogic Server Administration Scripting Shell: wls:/offline>
- Run
/oracle_common/common/bin/wlst.sh
This will connect your admin server to the node manager: wls:/base_domain/serverConfig>
Note# dont use the localhost when connecting admin-server to node-manager
- $ connect('admin', 'adminadmin1', 't3://<ip address or domain name:7001')
Enrolling this machine with the domain directory
- $ nmEnroll('/nhin/server/wls1221c/user_projects/domains/base_domain/','/nhin/server/wls1221c/user_projects/domains/base_domain/nodemanager/')
- $ exit()
Running NodeManager
- $
/user_projects/domains/base_domain/nodemanager/startNodeManager.sh
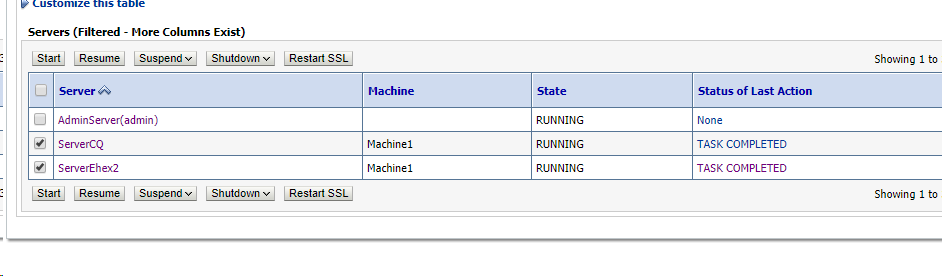
Admin Console: under Environment > Servers > Tab: Control
- Select: ServerCQ, ServerEhex
- Click: Start
Deploy CONNECT on both Managed Servers.
Set up the following datasources using the WebLogic Administration Console. "Name" can be any value an implementer chooses. The CONNECT Product team recommends using meaningful names.
Name | JNDI Name | Database Name |
AdminGuidbDataSource | jdbc/adminguidb_datasource | adminguidb |
AssigningAuthoritydbDataSource | jdbc/assigningauthoritydb_datasource | assigningauthoritydb |
AsyncMsgsDataSource | jdbc/asyncmsgs_datasource | asyncmsgs |
AuditDatasource | jdbc/auditrepo_datasource | auditrepo |
ConfigdbDatasource | jdbc/configdb_datasource | configdb |
DocRepositoryDataSource | jdbc/docrepository_datasource | docrepository |
EventdbDataSource | jdbc/eventdb_datasource | eventdb |
MessageMonitoringdbDataSource | jdbc/messagemonitoringdb_datasource | messagemonitoringdb |
PatientCorrelationdbDataSource | jdbc/patientcorrelationdb_datasource | patientcorrelationdb |
PatientdbDataSource | jdbc/patientdb_datasource | patientdb |
TransRepoDataSource | jdbc/transrepo_datasource | transrepo |
Browse to the WebLogic Administration Console (typically http://<localhost or IP Address>:7001/console) and log in
Under Services > Data Sources > New (select: Generic Data Source)
- Enter Name, jndi name, and database type (MySQL)..
- Select the appropriate driver for the environment and click Next.
- Configure transaction setting -- for CONNECT Product team testing Support Global Transactions was unchecked. Click Next.
- Enter User Name, Password, Server Name, Database Name, and Port Number. Click Next.
- Default user: nhincuser/nhincpass.
- Test the configuration using the "Test Connection" button. If successful, click Next or review changes
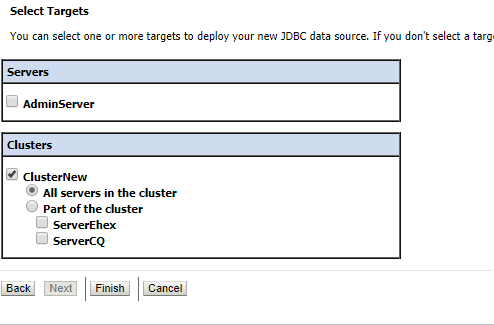
- Fix Select Targets -- Check the box next to "All servers in the cluster". Click Finish.
Browse to the WebLogic Administration Console (typically http://<localhost or IP Address>:7001/console) and log in.
- In the left Domain Structure panel, go to Deployments. Click Install.
- Browse to the <binary-location>/CONNECT-<VERSION>/CONNECT/<VERSION>/CONNECT-WL-<VERSION>.ear file. Click Next.
- Ensure "Install this deployment as an application" is checked. Click Next.
- Check the Check the box next to "All servers in the cluster". Click Next.
Restarting server
Make sure the cluster servers are shutdown
- Under Environment > Servers > Tab: Controls
- Select: ServerCQ, ServerEhex
- Click: shutdown
Restart WebLogic and NodeManager
- using Stop and Start shell script
Once the AdminConsole come back: restart your cluster servers
- Under Environment > Servers > Tab: Controls
- Select: ServerCQ, ServerEhex
- Click: Start
Enable logging
- Under Environment > Servers > "ServerCQ" > Tab:Debug
- Select: All (Service that need debugging)
- click: enable
- Shutdown: "ServerCQ"
- Restart: Weblogic
- Restart: nodemanager