Admin GUI User Manual
- Eric McDonald (Unlicensed)
- Patrick Lobre (Unlicensed)
- Tabassum Jafri
Version# | Date | Modified By | Description of Modification |
|---|---|---|---|
| 1.0 | 06/20/2017 | Sovann Huynh | Converted from a design document into a full user manual |
| 1.1 | 1/4/2018 | Tabassum Jafri | Added Exchange Manager GUI |
| 2.0 | 02/01/2018 | Sovann Huynh | Added Certificate Manager and Test Data Loader, deprecated Connection Manager |
| 2.1 | 10/22/2018 | Tabassum Jafri | Added Internal Endpoints properties section. |
| 2.2 | 11/02/2018 | Tabassum Jafri | Updated User Accounts and Cross-Gateway Query Client section. |
| 2.3 | 04/09/2019 | Eric McDonald | Text corrections on Import Wizard. |
Overview
The Admin GUI allows CONNECT administrators to monitor gateway statistics, test the gateway implementation and manage users and gateway configurations. This graphical administrative console includes the following:
- Controlled user access
- Basic system overview
- User accounts management
- Certificate management
- Connectivity testing
- Property files management
- Gateway to gateway messaging
- Direct service configuration*
* CONNECT leverages the Direct configuration module from the ONC-sponsored JAVA Direct Reference Implementation (RI) v 3.01.
Important note regarding UDDIConnectionInfo.xml and internalConnectionInfo.xml
As of CONNECT 5.1, both files have been replaced with the more versatile exchangeInfo.xml and internalExchangeInfo.xml files. For users of CONNECT 5.0 and earlier versions, substitute references to these new files with the original uddiConnectionInfo.xml and internalConnectionInfo.xml files
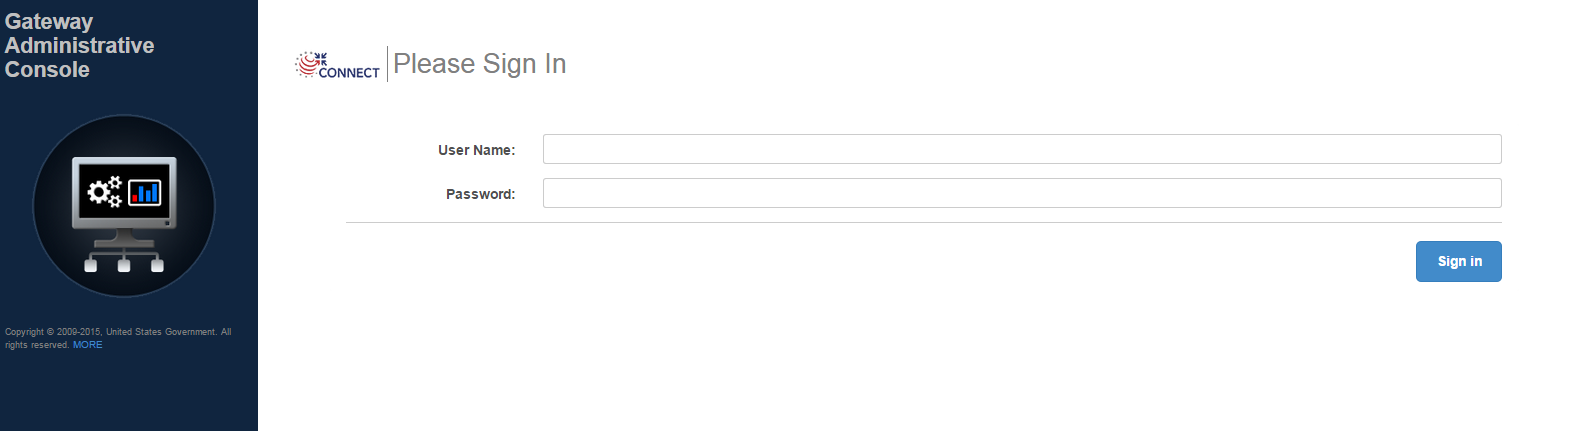
Login
User names are not case-sensitive but passwords are case sensitive. A default admin user is created during initial deployment.
Logging in for the first time?
When Admin GUI is first deployed, log in as ConnectAdmin using the password password. Be sure to change this immediately after logging in for the first time.
Gateway Administrative Console - Login
Session duration
Default session timeout is set to 10 minutes that is configured in session-config property in web.xml. This can be changed per implementation needs.
Gateway Status
This is the dashboard view since CONNECT 5.1.
The Gateway Status page provides an overview of the gateway health. This page includes two tabs – Dashboard, and Remote Gateway List and will be used by gateway administrators, to monitor gateway configurations.
Gateway Dashboard
The dashboard provides a view of gateway/system specifications
Gateway Status
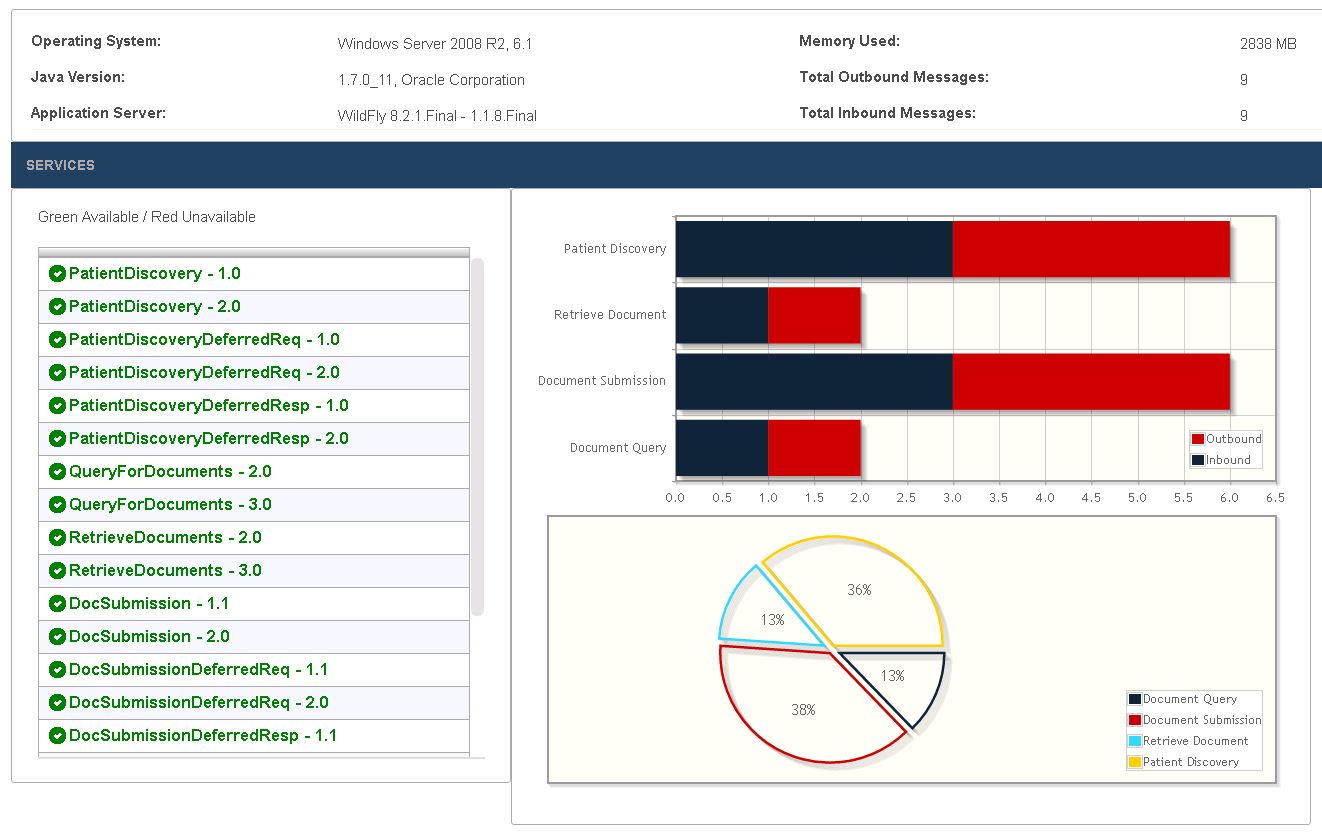
Gateway status parameters
| Parameter | Description |
|---|---|
| Operating system | Operating System that CONNECT software is running on |
| Total Inbound messages | The total number of messages received by the gateway |
| Total Outbound messages | The total number of messages sent by the gateway |
| Memory used | Memory utilized by the gateway instance. |
| Java Version | Java version CONNECT is running on |
| Application server | Application server/version that CONNECT is running on. |
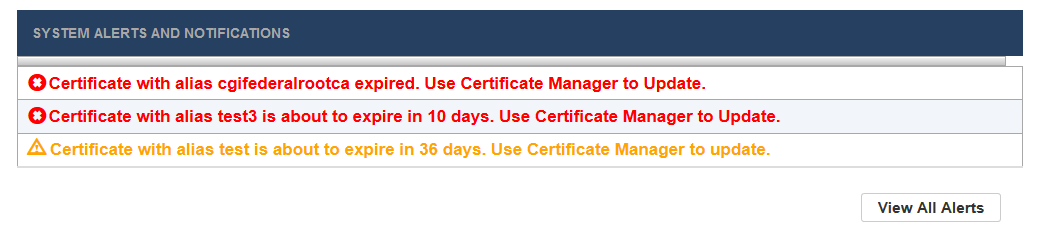
Alerts and notifications
The dashboard also provides important system alerts and notifications. Currently, only digital certificate status updates are included.
Remote Gateway List (Deprecated as of CONNECT 5.1)
The Remote Gateway page lists all the gateways that the CONNECT instance has been communicating with and displays the total transaction count by service.
Gateway Status - Remote Gateway
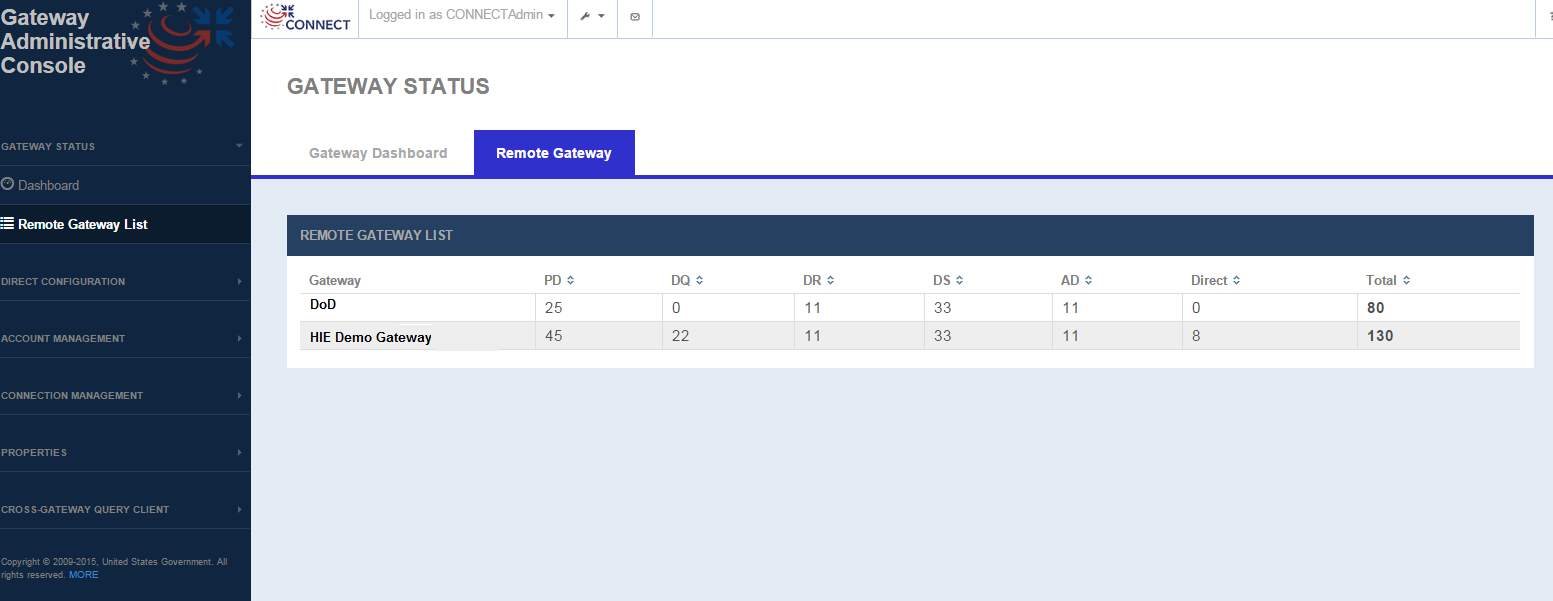
Remote Gateway List Display parameters
FIELD | DESCRIPTION |
|---|---|
Gateway | Remote gateway name as defined in the Exchange Manager. |
Count by service | Total gateway transaction count (inbound or outbound for any service) for a given remote gateway |
- PD | Synchronous PD – Displays total number of incoming PD and outgoing PD transactions - (Incoming synchronous PD requests from remote gateway + Outgoing synchronous PD requests to the remote gateway) If gateway supports Deferred transactions ie. for Deferred PD - Displays total number of incoming PD deferred requests and outgoing PD deferred requests - (Incoming deferred PD requests from remote gateway + Outgoing deferred PD requests to the remote gateway + Incoming deferred PD responses from remote gateway + Outgoing deferred PD responses to the remote gateway ) |
- QD | Synchronous only – Displays total number of incoming QD and outgoing QD transactions - (Incoming synchronous QD requests from remote gateway + Outgoing synchronous QD requests to the remote gateway) |
- RD | Synchronous only – Displays total number of incoming RD and outgoing RD transactions - (Incoming synchronous RD requests from remote gateway + Outgoing synchronous RD requests to the remote gateway) |
- DS | Synchronous DS – Displays total number of incoming DS and outgoing DS transactions - (Incoming synchronous DS requests from remote gateway +Outgoing synchronous DS requests to the remote gateway) If gateway supports Deferred transactions ie. for Deferred DS - Displays total number of incoming DS deferred requests and outgoing DS deferred requests - (Incoming deferred DS requests from remote gateway + Outgoing deferred DS requests to the remote gateway + Incoming deferred DS responses from remote gateway + Outgoing deferred DS responses to the remote gateway ) |
- AD | Synchronous only – Displays total number of incoming AD and outgoing AD transactions
|
- Direct | Displays total number of incoming Direct and outgoing Direct transactions
|
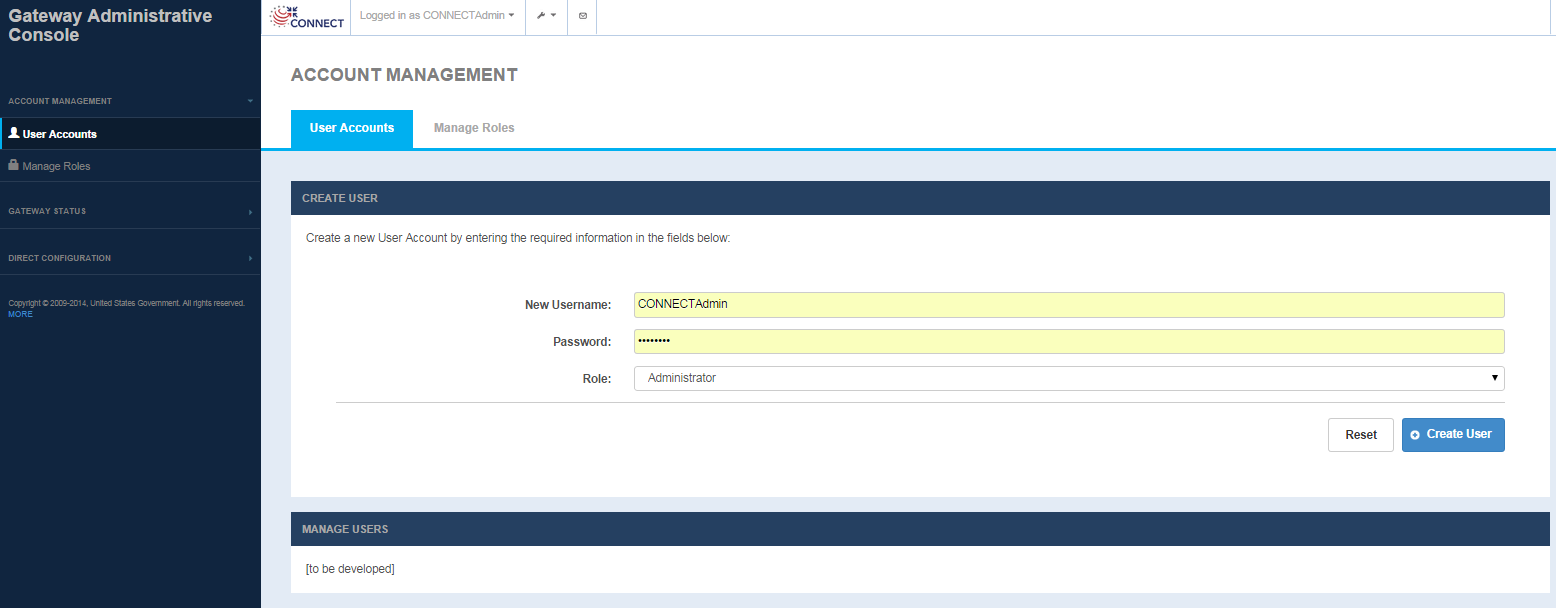
Account Management
Access to functionality within the Admin GUI is roles driven. Each user is assigned a role that determines access to pages and hence functions within the Admin GUI. Every role needs to be configured with certain privileges for each page i.e., no access or view/edit access. Implementers should use roles to limit access of certain features to specific users. E.g., a user with say an Admin role can access the Account Management->Create user page and create other users, but a user created with 'User' role should not have such privileges.
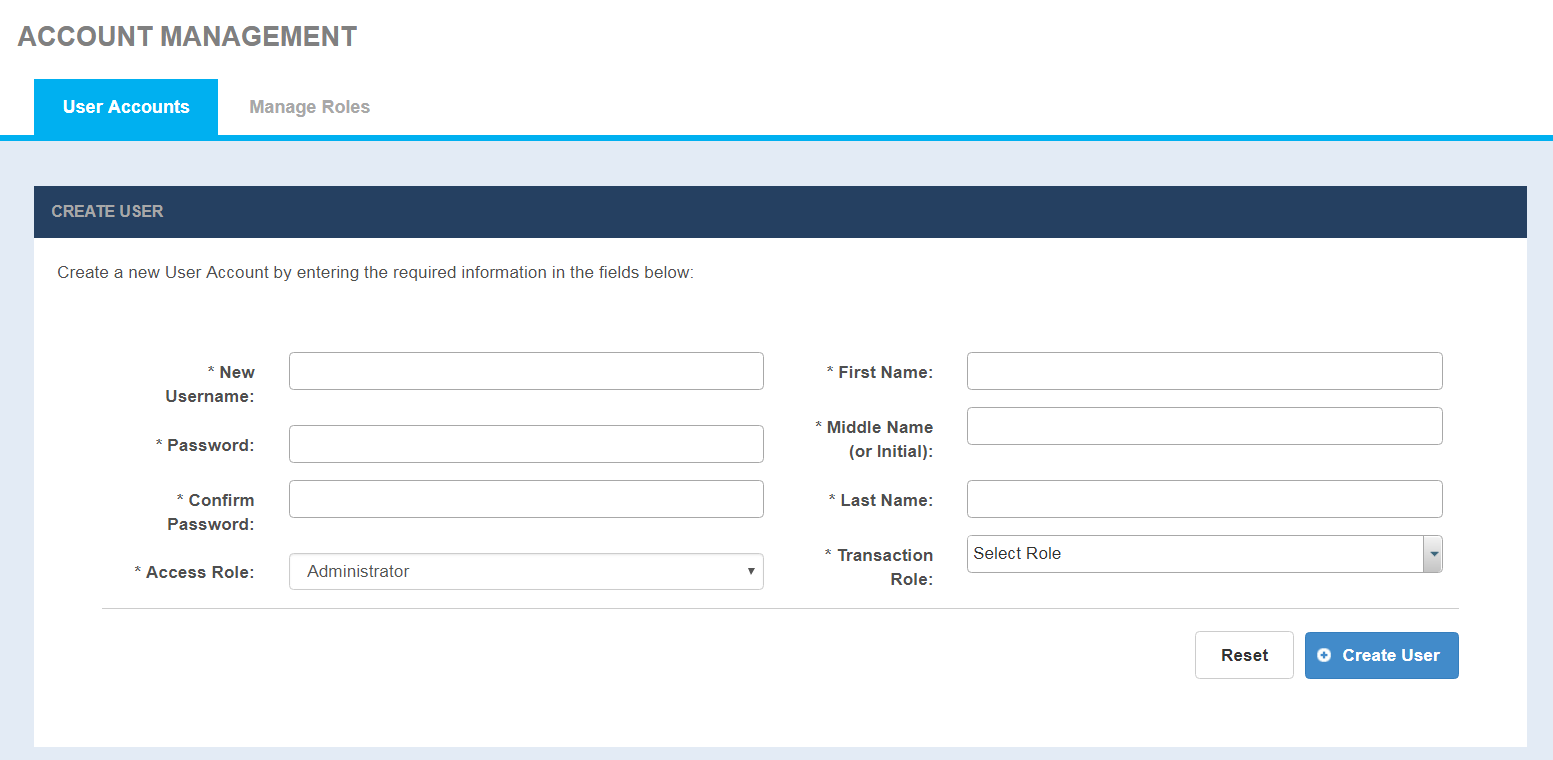
User Accounts
Selecting the default User Accounts tab under Accounts Management displays the User Accounts, Create User Page to create a user and Manage User page to delete users.
Account Management - User Accounts

With CONNECT 5.2 and later, the User Accounts screen has 4 new mandatory fields namely: First name, Middle name or Initial, Last name and Transaction Role. These fields will be used to generate SAML assertion for Cross-Gateway Query client.
Manage Roles
Managing roles allows an admin to set access privileges for each user role. For each of the roles that are configured, access levels for No access, Read only and Read Write can be configured by pages of functionality.
Account Management - Manage Roles Screen
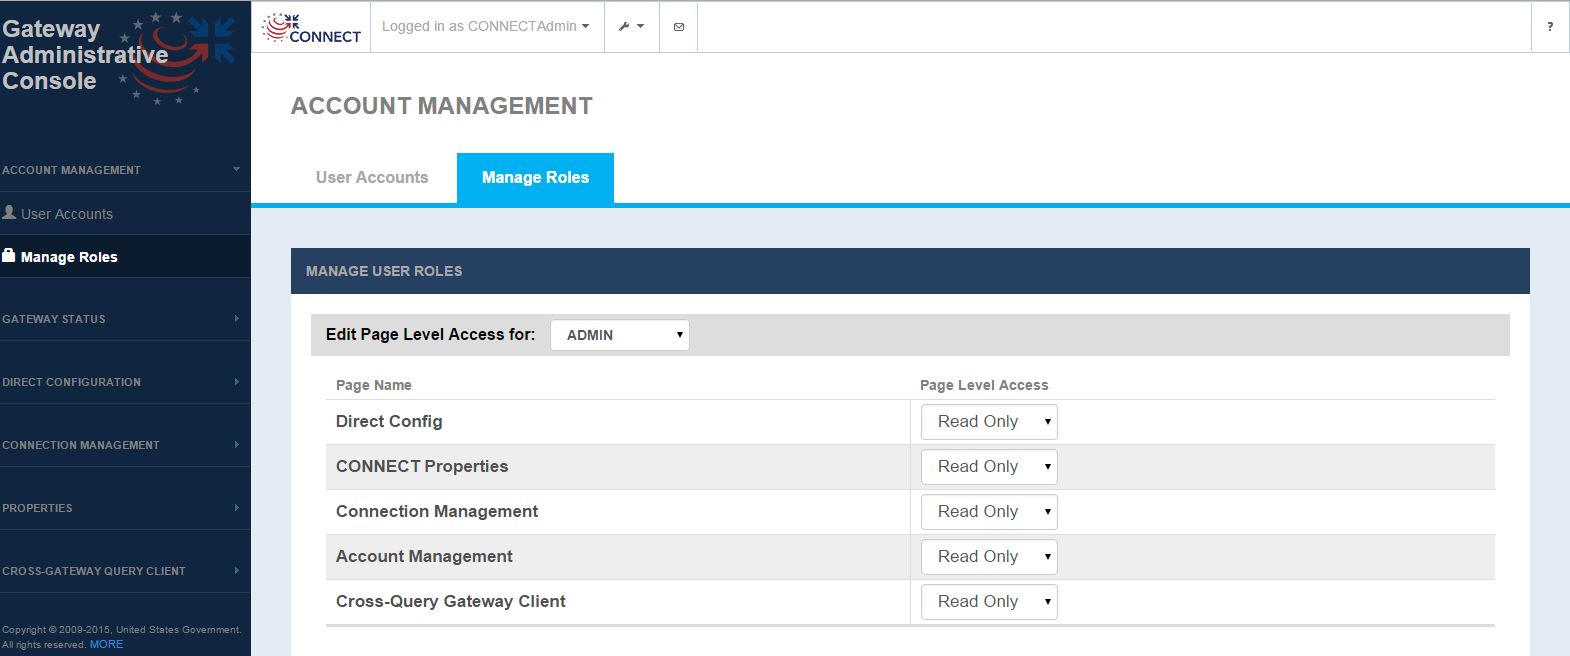
Future releases will allow for creating new roles capability. The default access is defined below, which can be changed through the Manage User Roles screen.
Default page level access
| Account Management | Direct Config | Audit Search | Connection Management | Universal Client | CONNECT Properties | FHIR Resources | |
|---|---|---|---|---|---|---|---|
| Admin | Read Write | Read Write | Read Write | Read Write | Read Write | Read Write | Read Write |
| Super User | No Access | Read Write | Read Write | Read Write | Read Write | Read Write | Read Write |
| User | No Access | Read Write | Read Write | Read Write | Read Write | Read Write | Read Write |
Manage User Roles screen fields
FIELD | DESCRIPTION |
|---|---|
Edit Page Level Access | Select the role that is being configured (Current options: ADMIN, SUPER USER, USER) |
| Page Name | Pages are listed to configure the access rights by role for each page.
|
| Page Level Access |
Currently Read only and Read Write both function in the same way ie., both have the same access (read/write). This will be refined in future iterations. |
Access to functionality within the Admin GUI is roles driven. Each user is assigned a role that determines access to pages and hence functions within the Admin GUI. Every role needs to be configured with certain privileges for each page i.e., no access or view/edit access. Implementers should use roles to limit access of certain features to specific users. E.g., a user with say an Admin role can access the Account Management->Create user page and create other users, but a user created with 'User' role should not have such privileges.
User Accounts
Selecting the default User Accounts tab under Accounts Management displays the User Accounts, Create User Page to create a user and Manage User page to delete users.
Account Management - User Accounts
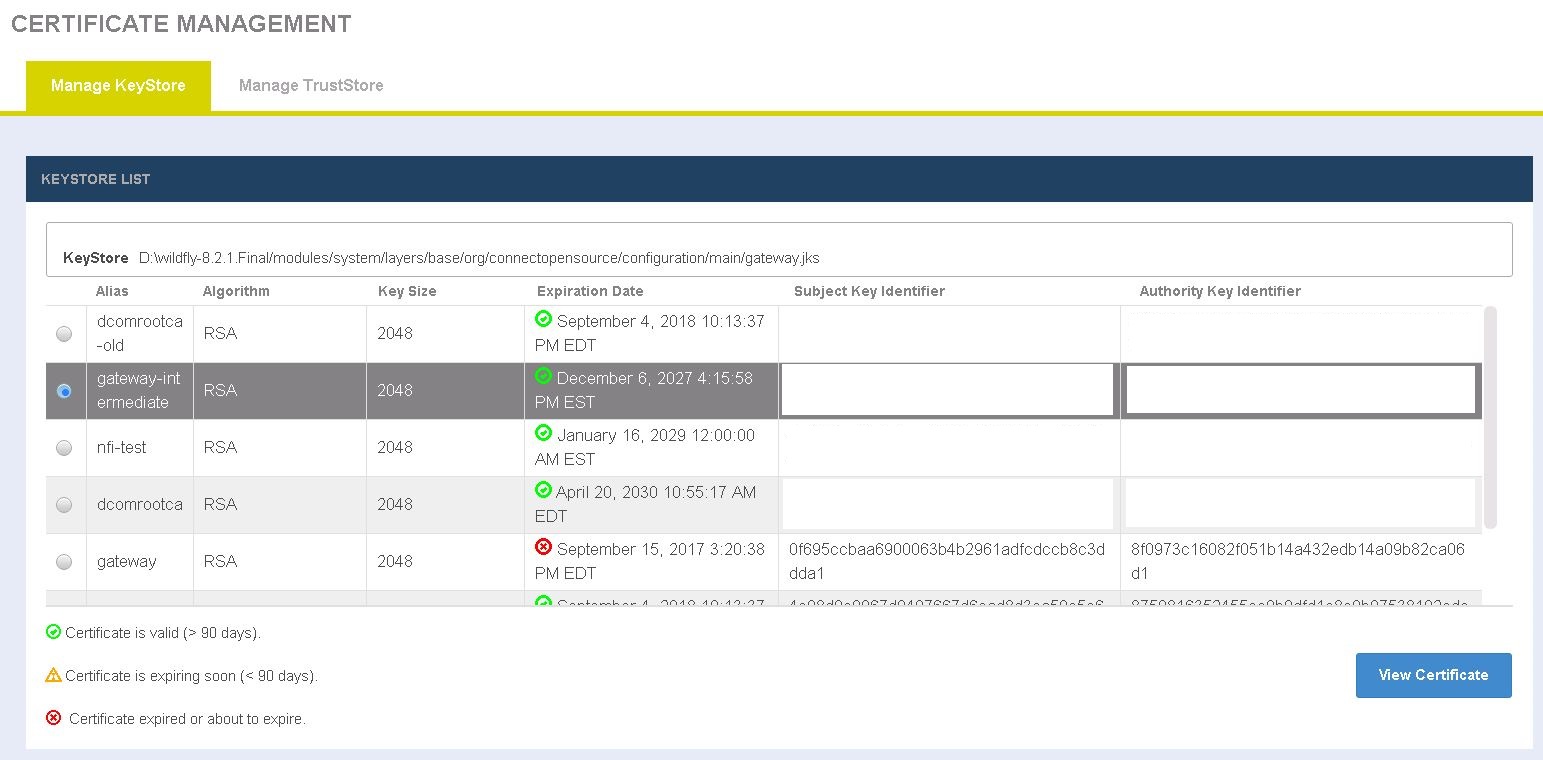
Certificate Management
Certificate Management interface is for to simplify the process of creating new certificate and managing self-signed certificates, CA-issued SSL certificates within KeyStore and TrustStore. It is divided into three tabs - Manage KeyStore, Manage TrustStore and Import Wizard
Manage KeyStore
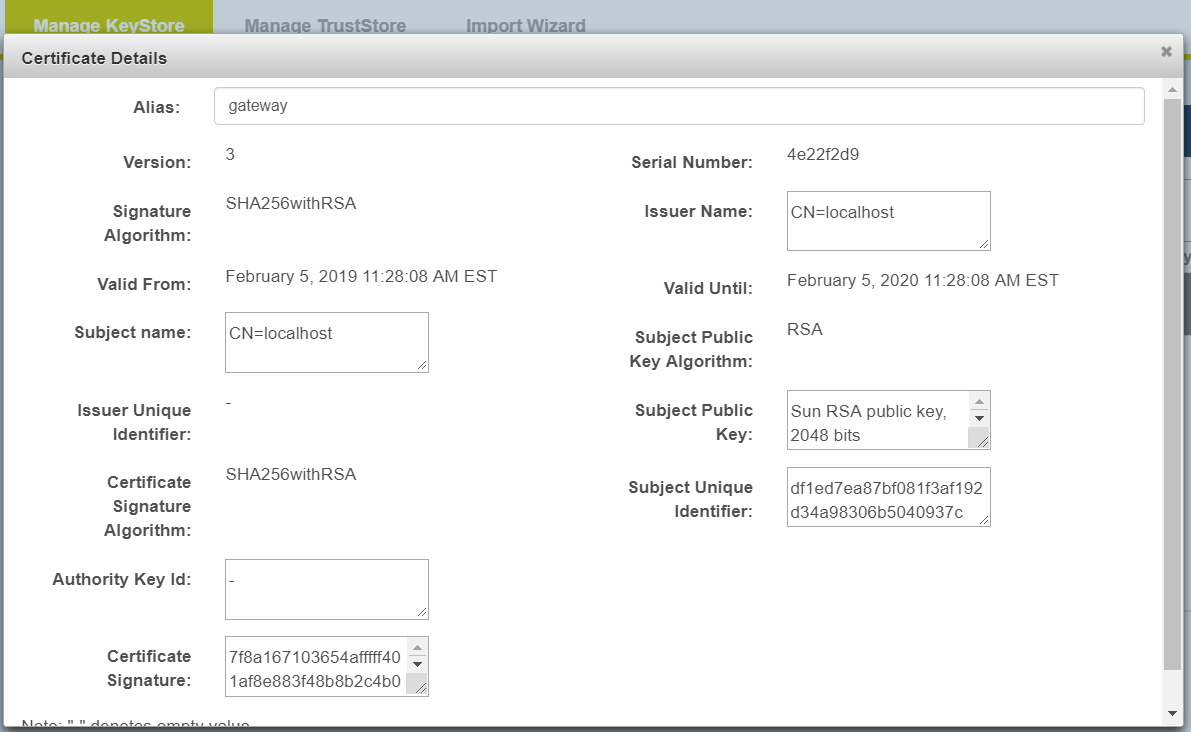
Selecting the default Manage KeyStore tab under Certificate Management displays the Manage KeyStore page that shows list of available Keystores from CONNECT configuration. For security purposes, users can only view certificates from KeyStore list.
Certificate Management - Manage KeyStore page
Certificate Management - Manage KeyStore - View Certificate Details page
Manage TrustStore
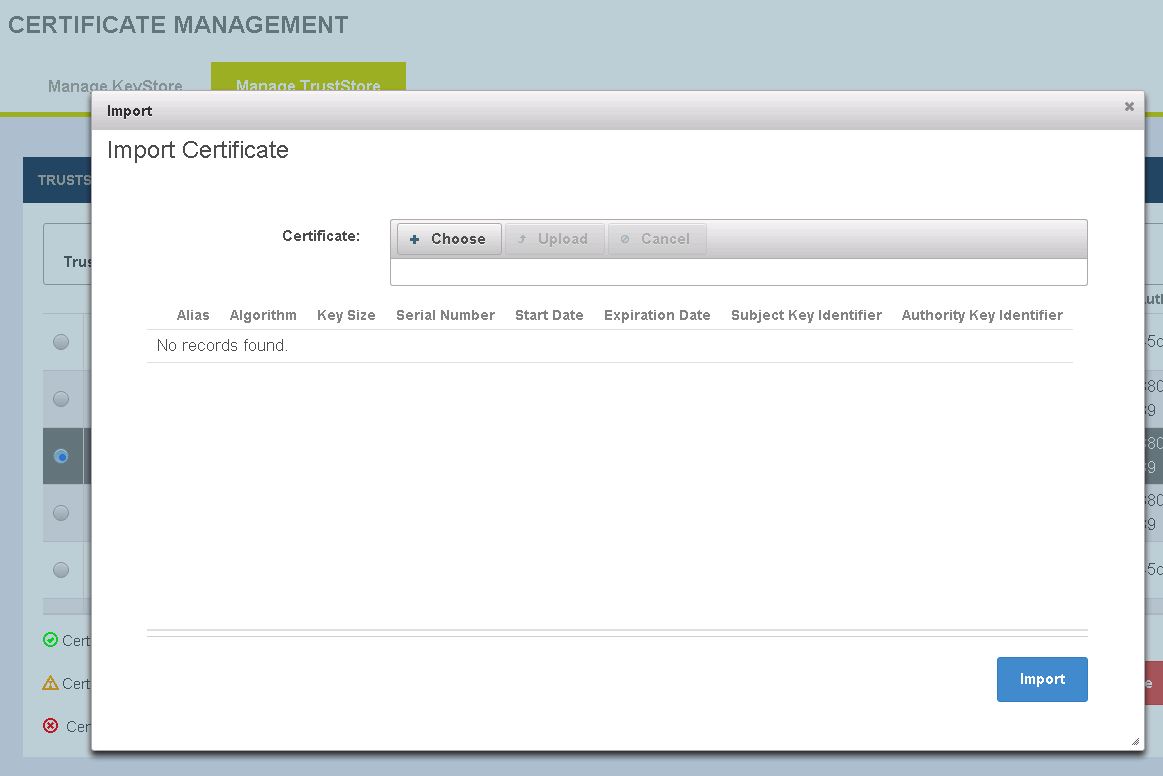
The Manage TrustStore page shows list of available Truststores from CONNECT configuration. Users allowed to import a new certificates into Truststore and edit, delete an existing certificates from Truststore.
Certificate Management - Manage TrustStore page

Certificate Management - Manage KeyStore - Import Certificate page
From the Manage TrustStore tab, click on Import. In Import child window, click Choose and browse to the desired certificate. Be sure to click Upload, change Alias name for the newly uploaded certificate and click Import to complete the import process.
Certificate Management - Manage TrustStore - Delete Certificate
To delete a certificate from the Truststore, select the certificate and click Delete. Certificate will be deleted once after providing the password. Note that, Certificate manager will not allow deletion of its own public certificate.
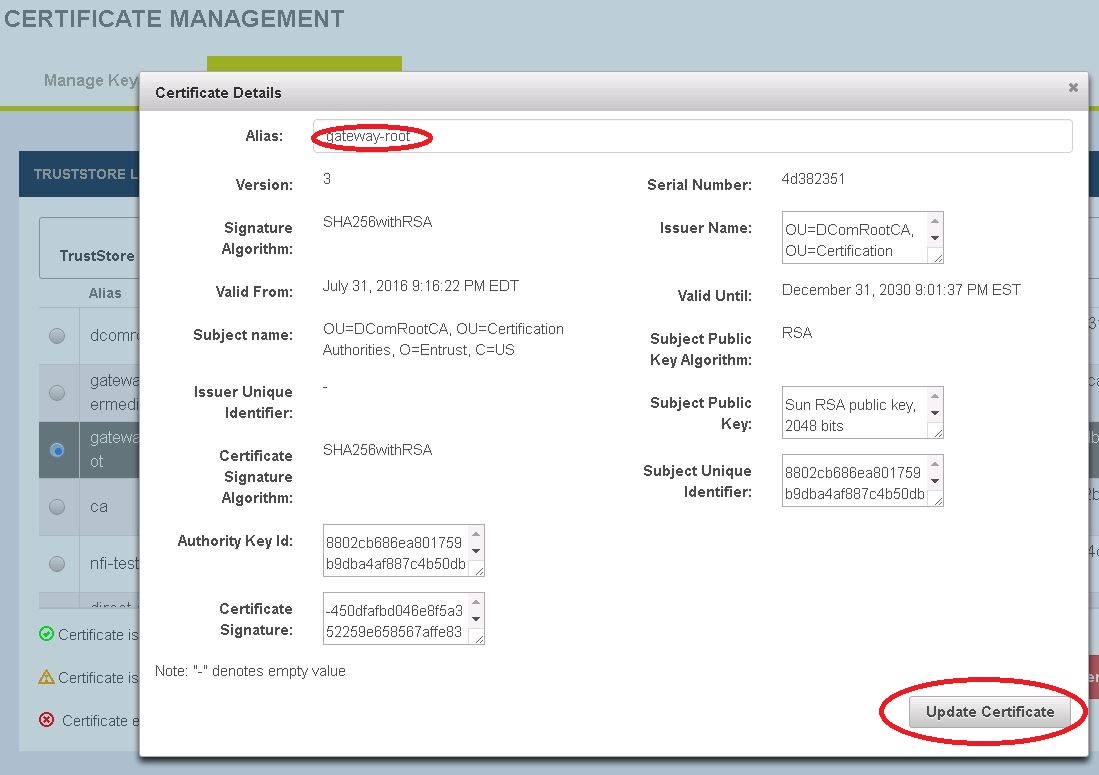
Certificate Management - Manage TrustStore - View and edit Certificate
Select a certificate from the list and click View. In the view Certificate Details window, user allowed to edit only Alias name and click Update Certificate for changes to take place.
Certificate Management - Manage TrustStore - Refresh certificates
Truststore list can be refreshed after certificate changes have been made without a server restart. Click on the Refresh button to enable the updates.
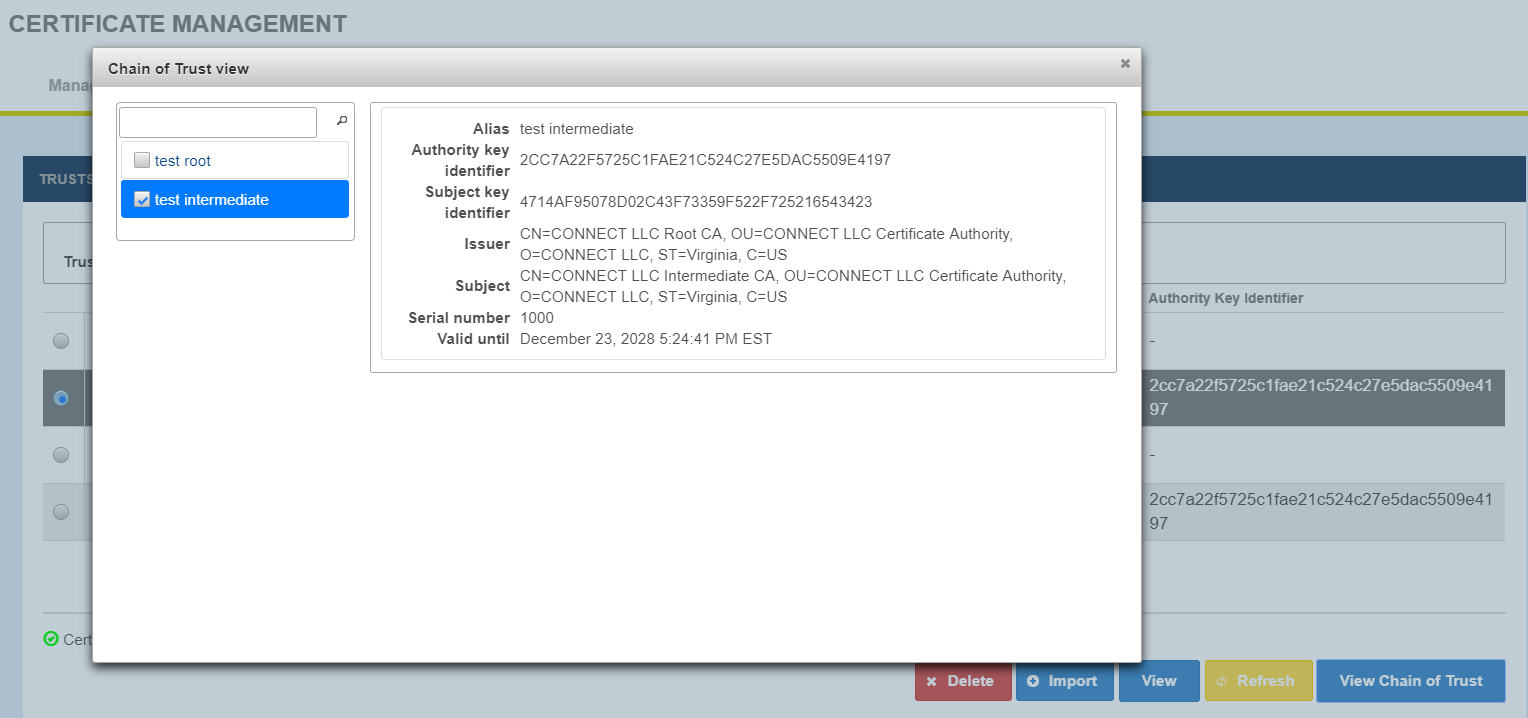
Certificate Management - Manage TrustStore - View Chain of Trust
View Chain of Trust shows associated chained certificates. Select a record and click View Chain of Trust to view certificates chain.
Import Wizard
Import Wizard
While replacing the self-sign certificates with the CA certificates imported using Import Wizard, user must exercise caution and verify, before replacing, if they have imported the root, intermediate(s) and leaf certificates.
Import Wizard interface partly automated the process of creating new certificate and importing CA certs into CONNECT configuration. It is divided into five tabs - Start, Create Certificate, Certificate Signing Request,CA Providers, Import SSL Certificate. Import Wizard functions as below:
- Allow user to create new certificate
- Allow user to create Certificate Signing Request (CSR/PKCS10)
- User must manually submit the CSR to their Certificate Authority (CA) to get a trusted certificate for their server
- Allow user to import server Certificate (CSR Reply) and CA certificates (chain of trust)
- Creates a backup of KeyStore and TrustStore under CONNECT configuration //importWizard/temp
- Creates a new KeyStore and TrustStore for replacement under CONNECT configuration //importWizard/new
- After successful Import Wizard process completion, the user must manually:
- Replace CONNECT server configuration KeyStore and TrustStore with the files under //importWizard/new
- Restart the Server
- Verify the AdminGUI functionality works and Manage KeyStore, Manage TrustStore list new certificate
Cancel Info
After CSR Reply (real server certificate), Do not use the Cancel button (on New Certificates). This action will delete the temporary copy and remove the PrivateKey associated with the new certificate
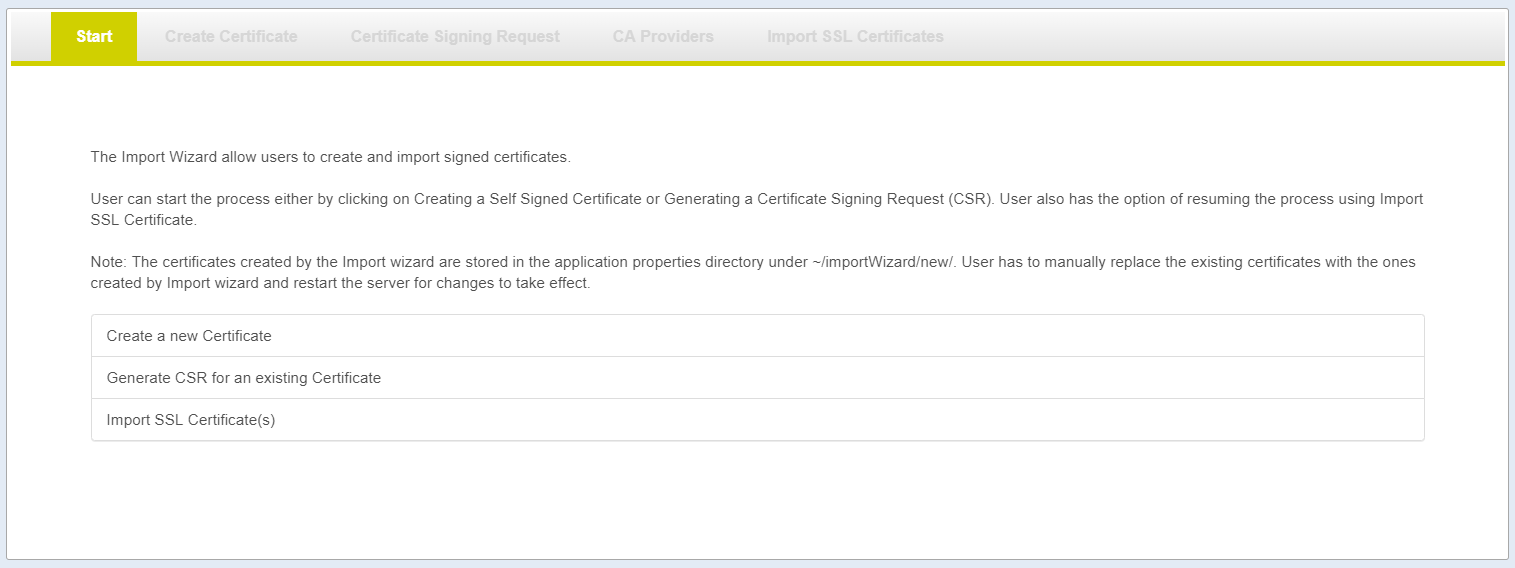
Start Tab
There are three links in the Import Wizard that the user can start:
- Create a new Certificate.
- Generate CSR for an existing Certificate
- Import SSL Certificate
Create Certificate Page

| Field | Detail |
|---|---|
| Required Fields |
|
Certificate Type | X509 certificate
|
| Exchange | Pre-configure value from caauthority.properties. Selection of Exchange prepopulate: OU, O, C |
| Alias | User can enter new alias or select an existing alias |
| CN (Reference Number) | Reference Number for new certificate |
| OU (Organizational Unit Name) | Organizational Unit Name representation for new certificate |
| O (Organization Name) | Organization Name representation for new certificate |
| C (Country Name) | County Name representation for new certificate |
| Action | Detail |
|---|---|
| Create |
|
| Cancel | Cleans up the temporary files generated by the Import Wizard |
| Next | Moves to the next step in the Import Wizard process |
Certificate Signing Request (PKCS10) Page
- Select the Alias to generate CSR.
- Generate Certificate Signing Request (CSR) PKCS10
- Copy the CSR Text or Download the CSR File
- Submit your CSR to CA Authority
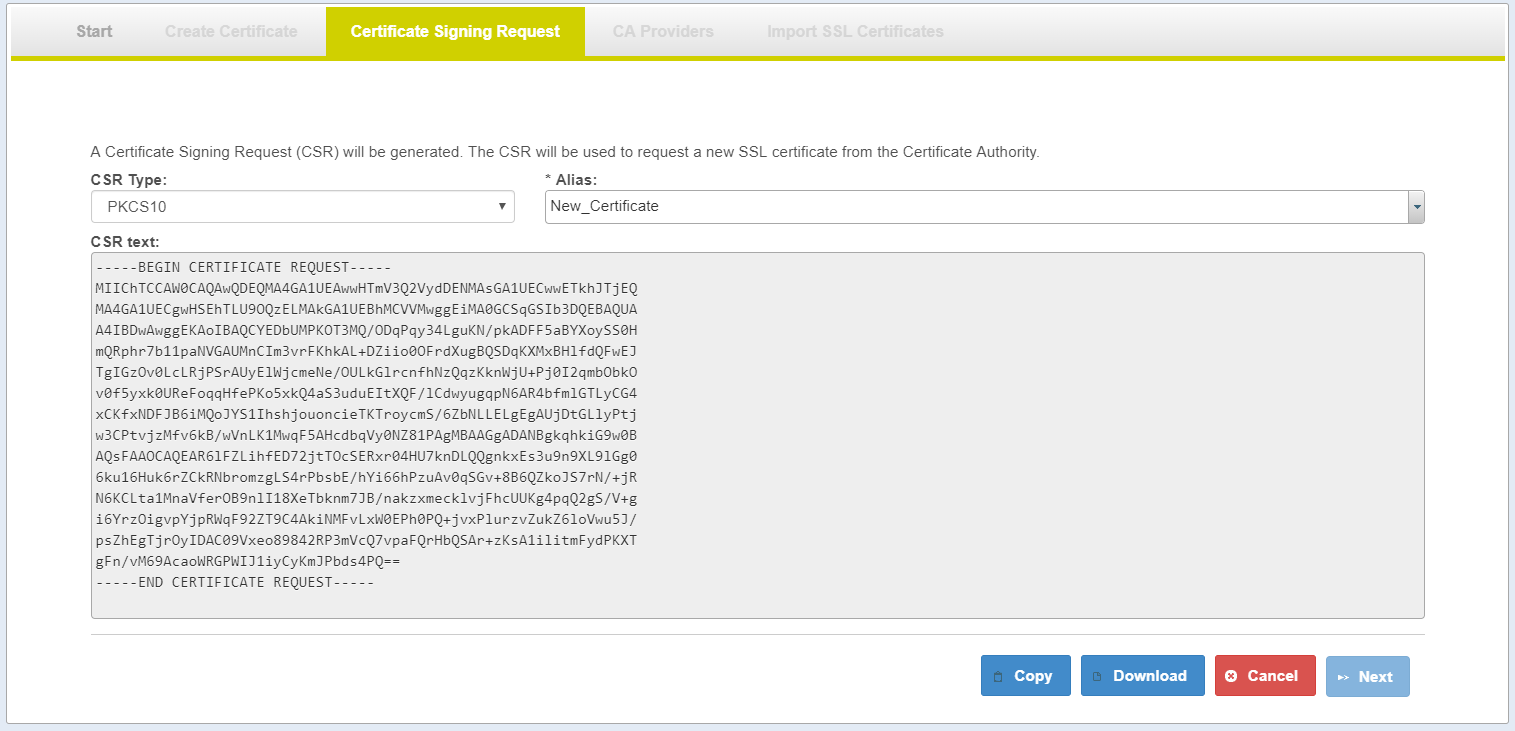
| Field | Detail |
|---|---|
| CSR Type | Certificate Signing Request type. Import wizard will create PKCS10 format |
| Alias | Selected alias used to generate CSR text |
| CSR Text | Once the selected CSR is created: Copy and Download buttons enabled |
| Next | After Copy or Download Next button enabled |
| Action | Detail |
|---|---|
| Alias | Select Alias to generate CSR text |
| Copy | This button will send the CSR Text to the clipboard;the CSR can be pasted into text file or text field. |
| Download | This button will open a file screen so that the user can download the file as text: alias_yyyyMMdd.csr |
| Cancel | Cleans up the temporary files generated by the Import Wizard. |
| Next | Moves to the next step in the Import Wizard. |
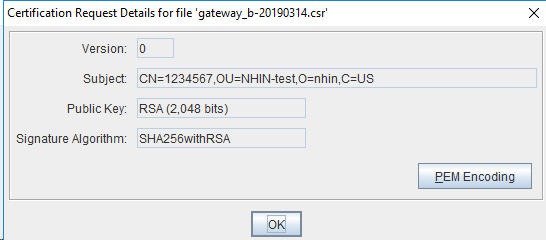
Verify CSR
There are several ways to verify your CSR:
- CSR Decoder
- openssl
- Keytool or keystore explorer
Verify CSR details as below: Signature Algorithm: SHA256withRSA, Public Key: RSA(2,048 bits)
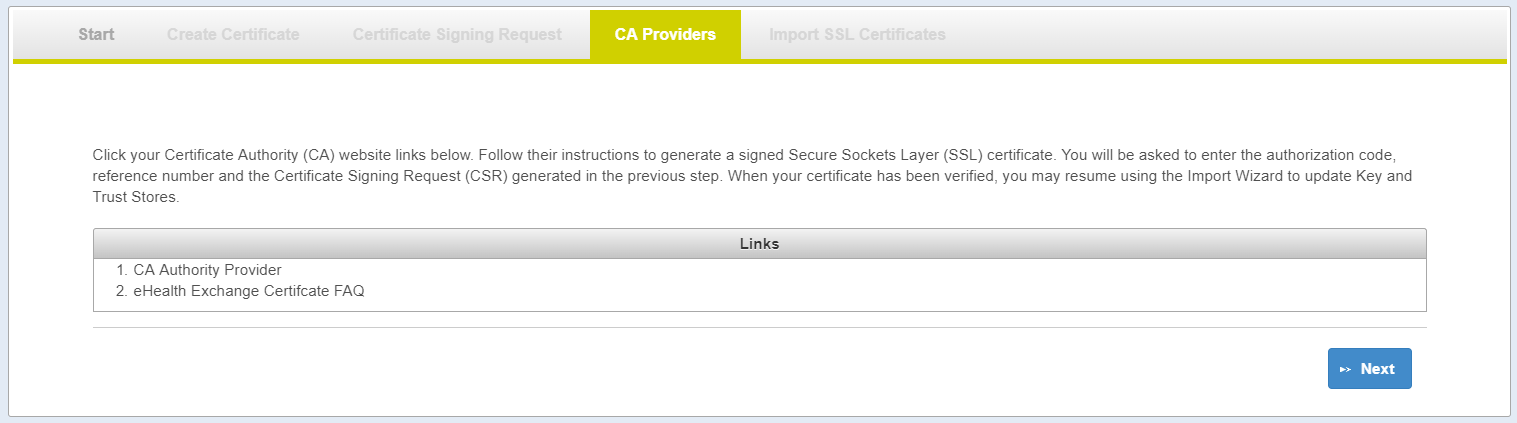
CA Providers Page
- Each exchange may have different CA Authority/Provider
- The link(s) provided in the
Available CA Providerstab is pulled from thecaauthority.propertiesfile. - The links will point to information needed to get a server certificate from CA Authority.
- Your server certificate (CSR Reply) must be issued by the CA Authority: CA Root and CA Intermediate(s) must be part of chain of trust in your certificate
Getting CSR Reply (server certificate)
Getting your server certificate is a manual process with your CA Authority; At this point you should have
- Created self-signed certificate (X509)
- Created certificate signing request (CSR/PKCS10)
You will need to submit your CSR to your CA Authority to get CSR reply (X509/your server certificate)
You need to view your server certificate with Keystore Explorer or Keytool
| View Certificate | Detail on Export to File |
|---|---|
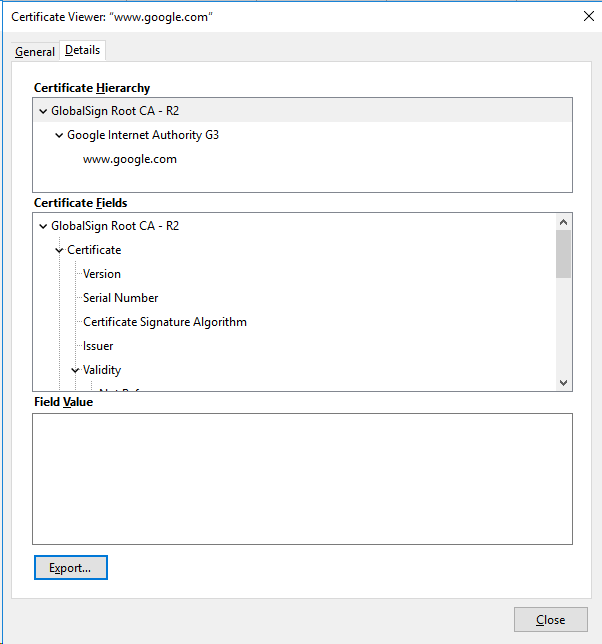
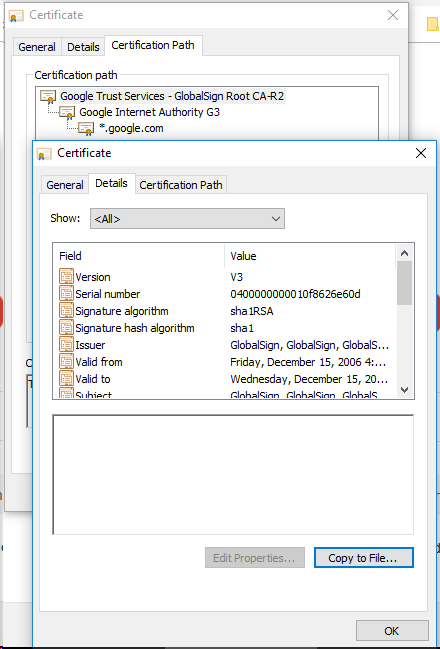
| Under Firefox you will see Certificate Hierarchy CA Root: CA Intermediate: Select: CA Root > Click: export Select: CA Intermediate(s) > Click: export |
| under google-chrome you will see Certificate Path CA Root: CA Intermediate: Select: CA Root > Click: View Certificate
Select: CA Intermediate(s) > Click: View Certificate
|
Import SSL Certificate Page
This page allows user to import server certificate, CA root and CA intermediate for the selected Alias.

Note# if your CA Certificates (Root and Intermediates) are not expired or still in used you do not need to replace your CA-Root and CA-Intermediate(s)
| Field | Details |
|---|---|
Required fields
Replacing your chain-of-trust
| Certificates will be imported for the selected alias |
| Alias | Select the certificate that you wish to replace. |
| Server Certificate | Upload your server Certificate |
| CA Root | Upload your CA Root Certificate |
| CA Intermediate(s) | Upload your CA Intermediate Certificate(s) |
| Action | Detail |
|---|---|
| Choose | Select the file that you wish to upload.
|
| Upload | Click Upload is required for the Intermediate(s) since the files are added to the list The same filename will only count as one file since the file gets replaced |
| Clear (intermediate) | Clear action will empty the CA Intermediate list. This will allow the user to empty the list. If a file gets into the list by mistake. |
| Clear (form) | Clear action will empty the input form for new input |
| Import | Commits the changes to the temporary keystore file.
|
| Complete | Create new KeyStore , TrustStore under //importWizard/new folder and this ends the Import Wizard process User must manually copy the files from new folder to CONNECT server configuration folder to use new certificates |
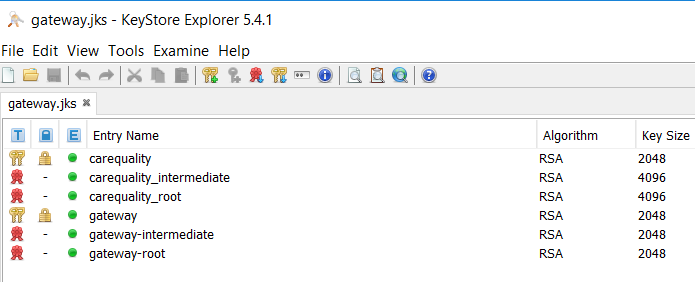
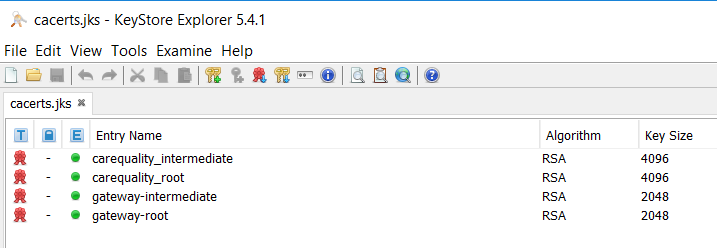
New Certificates view via KeyStore Explorer
| Import Result | Detail |
|---|---|
| Expected result from the import:carequality
if CA Root and CA intermediate are uploaded
|
| Import Result | Detail |
|---|---|
| Expected result from the import certificate (carequality) chain
|
Remote AdminGUI with Shared Certificate
- Exporting the KeyPair (Alias) from gateway-keystore
- Importing the KeyPair (Alias) into admingui-keystore
- Importing the CA certificates (chain of trust) into admingui-truststore
# keystore (gateway.jks) will be know as gateway-keystore.jks
# truststore (cacerts.jks) will be know as gateway-truststore.jks
# keystore (gateway.jks) will be know as admingui-keystore.jks
# truststore (cacerts.jks) will be know as admingui-keystore.jks

# export your KeyPair (server certificate) alias:gateway
$ keytool -importkeystore -srckeystore gateway-keystore.jks -destkeystore server.p12 -deststoretype PKCS12 -alias gateway

# import your KeyPair:server to AdminGUI alias:gateway
# if your alias are not the same under both server; make sure you rename server.p12 (alias)
$ keytool -importkeystore -srckeystore server.p12 -destkeystore admingui-keystore.jks -srcstoretype pkcs12 -alias gateway

# import your CA certificates (chain of trust) under both KeyStore and TrustStore
$ keytool -import -file caIntermediate.pem -keystore admingui-keystore.jks -alias gateway_intermediate
$ keytool -import -file caRoot.pem -keystore admingui-keystore.jks -alias gateway_root

$ keytool -import -file caIntermediate.pem -keystore admingui-truststore.jks -alias gateway_intermediate
$ keytool -import -file caRoot.pem -keystore admingui-truststore.jks -alias gateway_root
Remote AdminGUI with Self-sign Certificate
- Import CA Certificates into admingui-truststore
replacing the AdminGUI (certificate)
- Export certificate from admingui-keystore
- Import certificate into gateway-truststore
- Import certificate into admingui-truststore
#import ca certificate into admingui-truststore (only if the ca certificate need to be replace)
$ keytool -import -file caIntermediate.pem -keystore admingui-truststore.jks -alias gateway_intermediate
$ keytool -import -file caRoot.pem -keystore admingui-truststore.jks -alias gateway_root

#if you are replacing the self-sign certificate it must be trusted by the gateway and admingui
$ keytool -v -export -rfc -keystore admingui-keystore.jks -alias gateway -file adminguiCert.pem
$ keytool -import -file adminguiCert.pem -keystore gateway-truststore.jks -alias admingui_gateway
$ keytool -import -file adminguiCert.pem -keystore admingui-truststore.jks -alias admingui_gateway
Test Data Loader
Creating and managing test data for use with the CONNECT reference implementation can be handled directly through the Admin GUI. This feature manipulates data in the CONNECT database tables that were created as part of the initial CONNECT setup and deployment process. Future enhancements for converting and exporting the data for use in other test systems are under consideration.
The CONNECT reference adapters use a default MPI XML file configuration. The CONNECT Test Data Loader manages data in the CONNECT patient and document database. To configure the reference adapter to query the patient database for patient matching, set the following in AdapterMpiConfig.xml (in the CONNECT properties directory):
<alias alias="mpichecker" name="mpidbjava" />
Patient data
Patients that have already been created are listed based on the defined patient identifier (note that this is not the database logical ID).
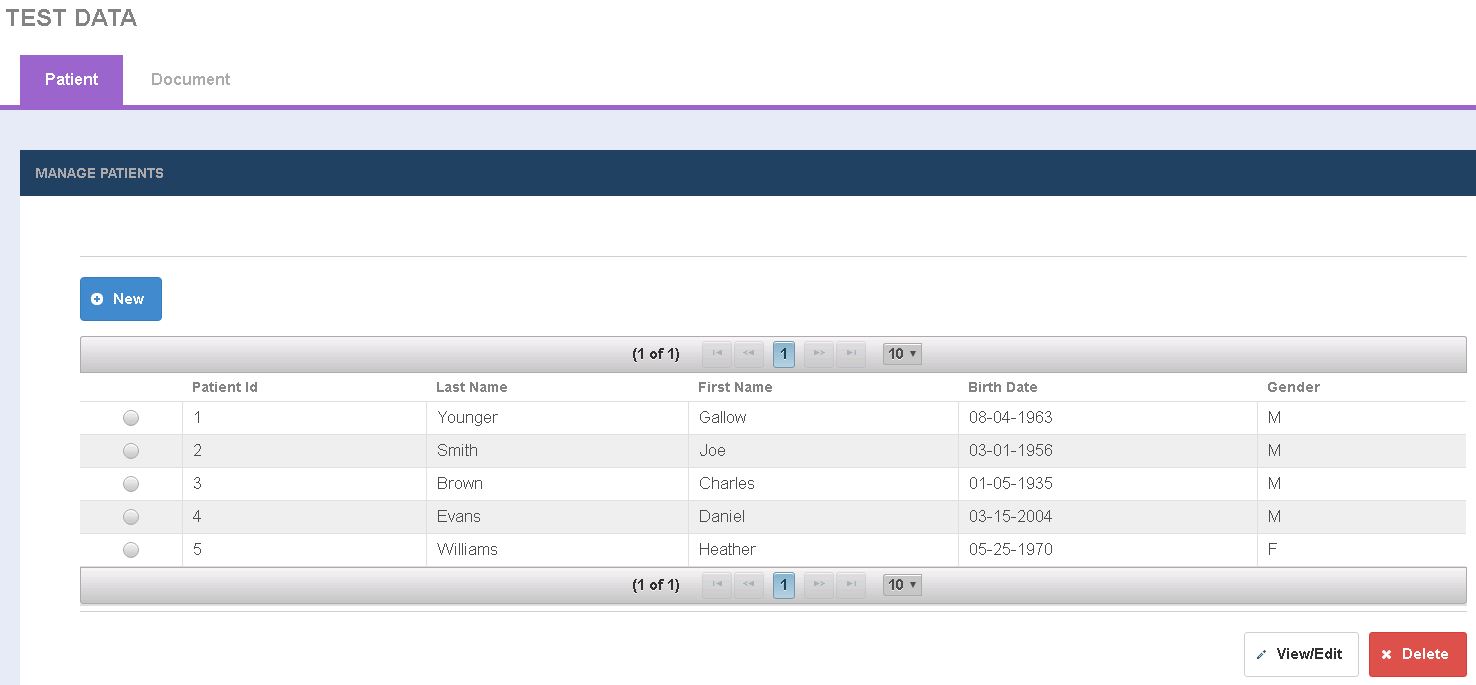
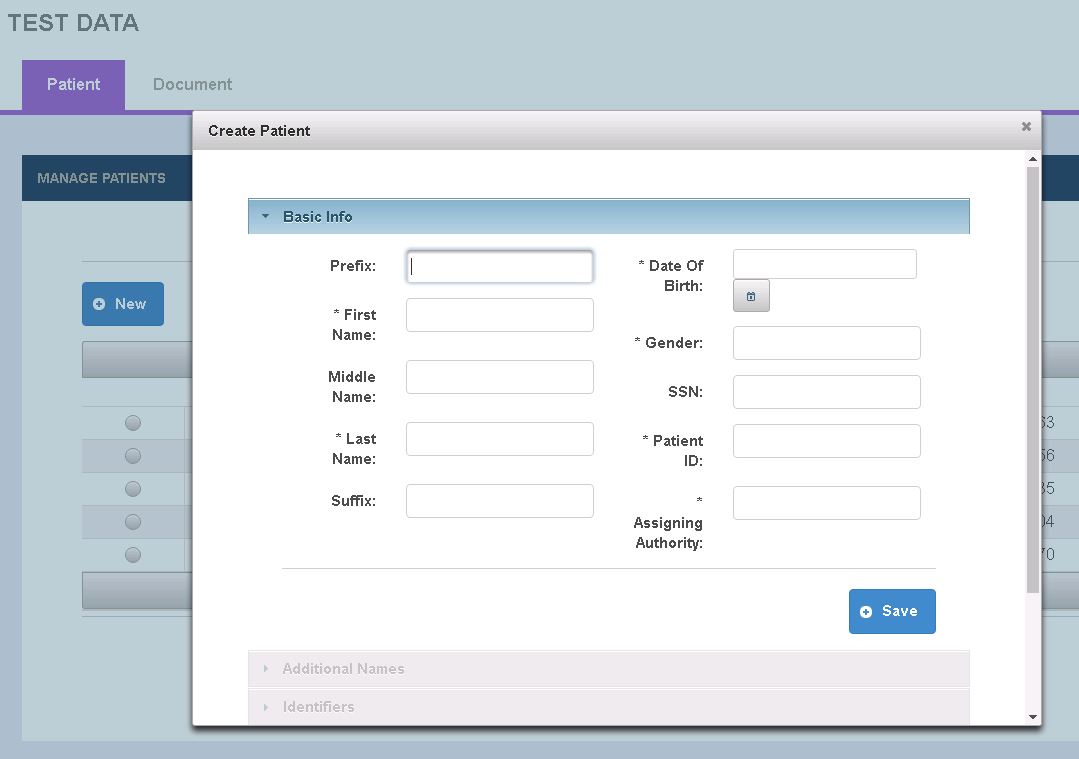
Creating and editing patient data is intuitive via the Admin GUI. Click New to add a new patient or select an existing patient and click View/Edit to view and/or edit the data. Be sure to save the data entered in each accordion section separately.
To delete a patient record, simply select the patient and click Delete.
Document data
Documents that have already been created are listed based on the defined document identifier (note that this is not the database logical ID).
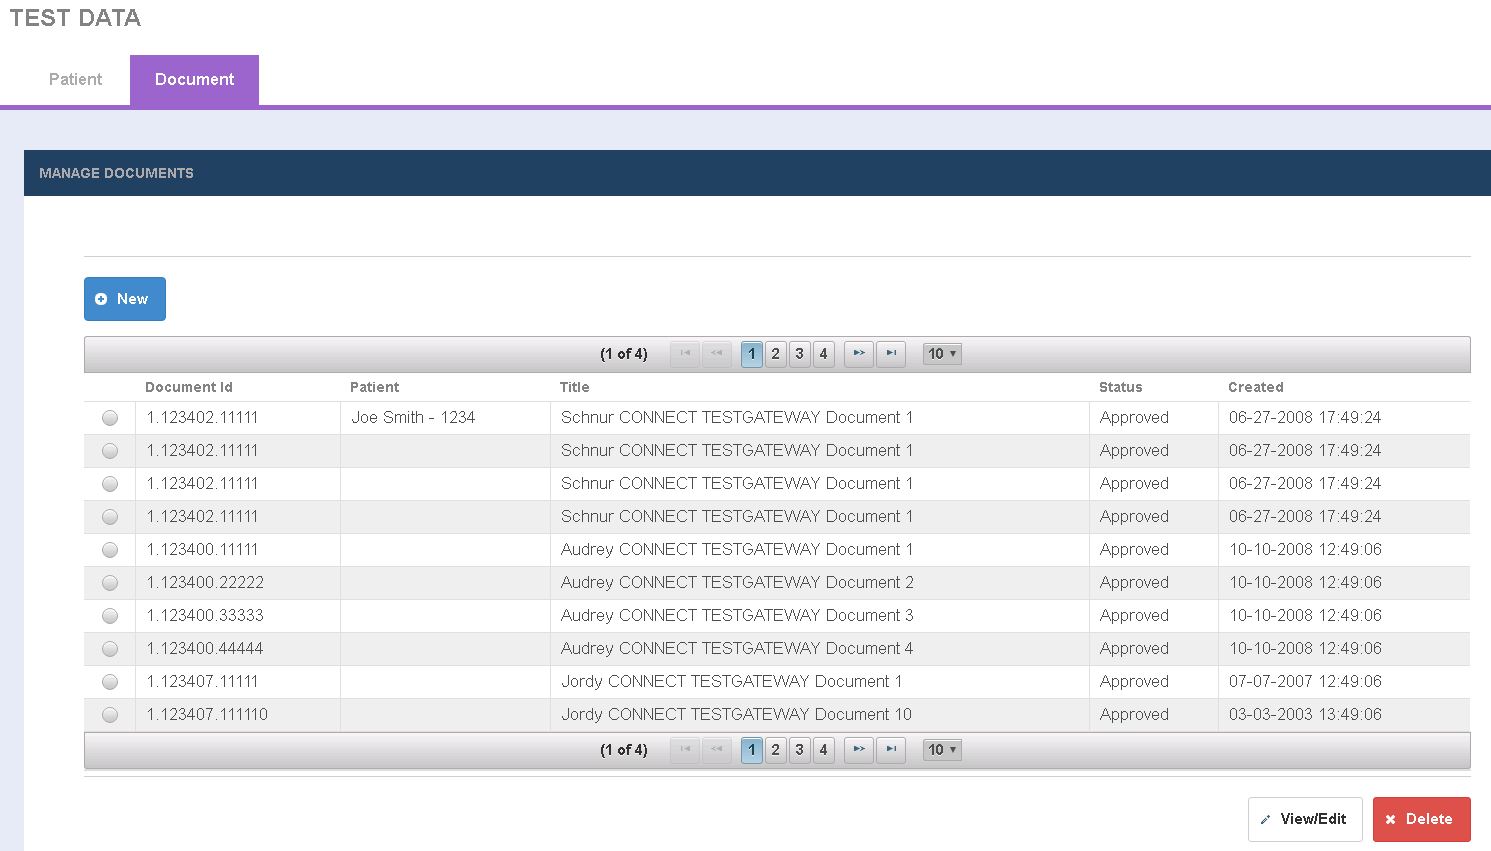
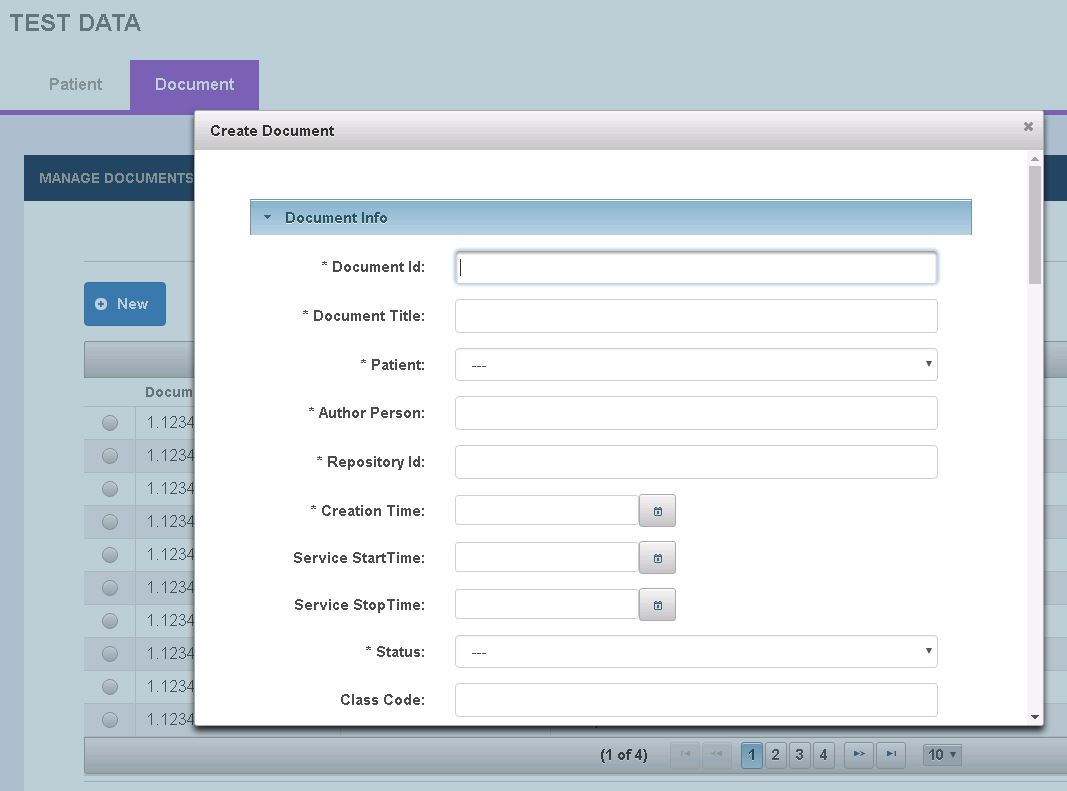
Creating and editing document data is intuitive via the Admin GUI. Click New to add a new document or select an existing document and click View/Edit to view and/or edit the data. Be sure to save the data entered in each accordion section separately.
To delete a document record, simply select the document and click Delete.
Important notes regarding document data
- Each document must belong to an existing patient (in the patient database).
- When selecting a patient for a document, an additional patient ID is created in the document database in the following format: <PATIENT.IDENTIFER>+<PATIENT.AA>+&iso. The CONNECT reference implementation uses this formatted value to find documents when an actual Document Query is submitted
- Uploaded documents will be stored in the document database (in the RawData column) as a base64-encoded blob
Connection Management
As of CONNECT 5.1, Connection Management is replaced with 113311950
Connection Management provides the administrator the option to view and manage connections to remote partners/gateways. The View External Connections screen as shown below is a view of the connections that are configured in the Web services registry or the exchangeInfo file organized by the Business entity i.e., the remote gateway organization. This screen allows for a ping utility that pings a particular service to determine if the service is up and running. This will help system administrators test service endpoints and troubleshoot firewall issues, certification validation issues and other connectivity both before functional testing with remote gateways and organizations and to investigate any issues that may arise in production due to changes in the local or exchange partner's gateway.
Connection Management -> View External Connections screen
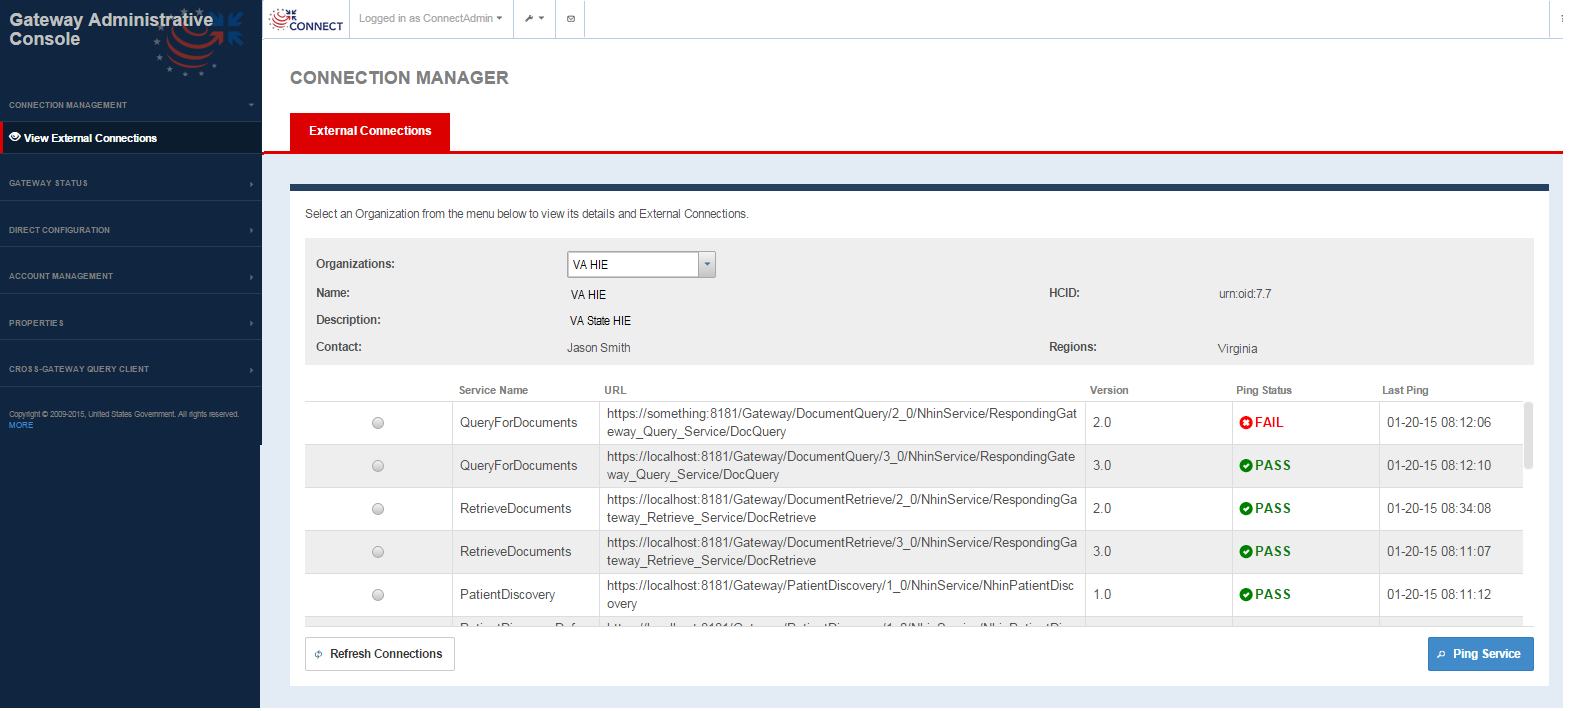
External Connection screen fields
FIELD | DESCRIPTION |
|---|---|
| Organization Information | |
Organization | Single select drop-down that lists all the remote organizations or business entities configured in the Exchange Manager configuration file. Selecting any business entity updates the business entity fields and the business service fields below to reflect the parameter values for the organization |
Name | Business Entity Name as defined in the Exchange Manager configuration file for the selected Organization |
Description | Business Entity description as configured in the Exchange Manager configuration file for the selected Organization |
Contact | Contact name as configured in the Exchange Manager configuration file for the selected Organization |
HCID | Home Community ID as defined in the Exchange Manager configuration file for the selected Organization |
| Regions | Region information configured in the Exchange Manager file for the selected Organization |
| Service Information | |
| Service Name | Business service Name for the selected Organization |
| URL | Endpoint for the web service |
| Version | Version of the service provided |
| Ping Status | Default is --. Once ping initiated, values are Pass or Fail If ping successful - Pass. If ping is not successful - Fail |
| Last Ping | Timestamp for last ping for the web service |
OPTION | DESCRIPTION |
| Ping Service | Selecting this option after selecting a particular service pings the service. If the ping passed, Ping Status displays Pass If the ping fails, Ping Status displays Fail. A fail could be indicative of some firewall issue, certificate set up issue or some other issue where in the remote service is down During the ping, a "Loading" status window is displayed as the service ping can take some time. Do not try to alter anything on the page during this period or navigate to another page |
| Refresh Connections | Refreshes the front end cache of connection endpoints to reflect current state of the business entity's services. |
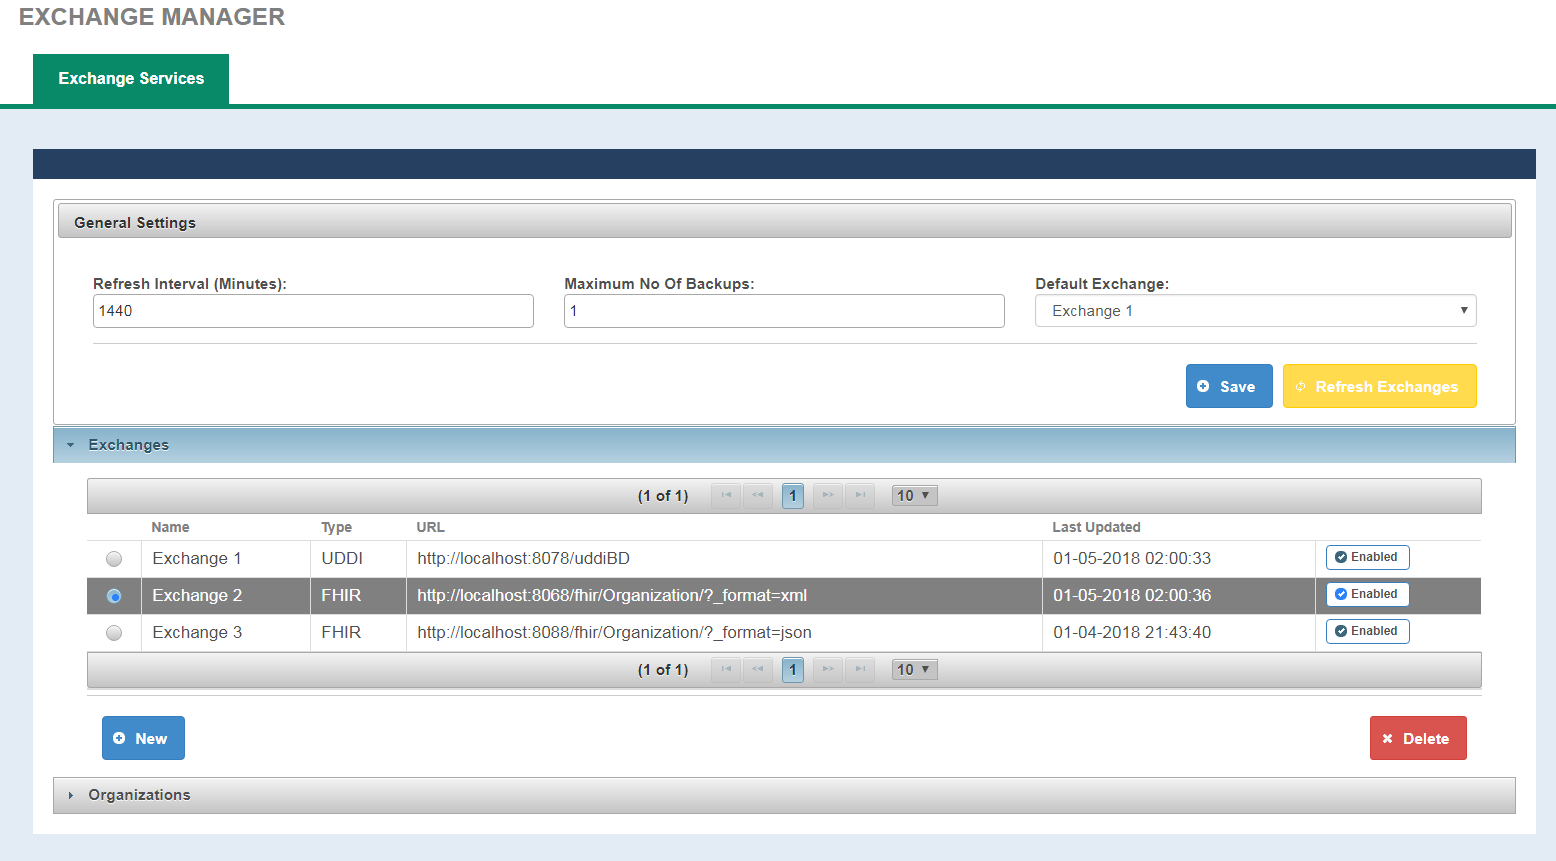
Exchange Management
Exchange Management provides a way for user to view/edit Exchange information, refresh/download Exchange information and to view and manage connections to remote partners/gateways. The View Exchange Services screen as shown below is a view of the exchange information that are configured in the exchangeInfo file organized by the general exchange information and Organizations i.e., the remote gateway organization. This screen allows users to configure exchange refresh process, initiate Refresh Exchange, add/delete an Exchange, enable/disable Exchange and to provides a ping utility that pings a particular service/or all services to determine if the service(s) is up and running. This will help system administrators test service endpoints and troubleshoot firewall issues, certification validation issues and other connectivity both before functional testing with remote gateways and organizations and to investigate any issues that may arise in production due to changes in the local or exchange partner's gateway.
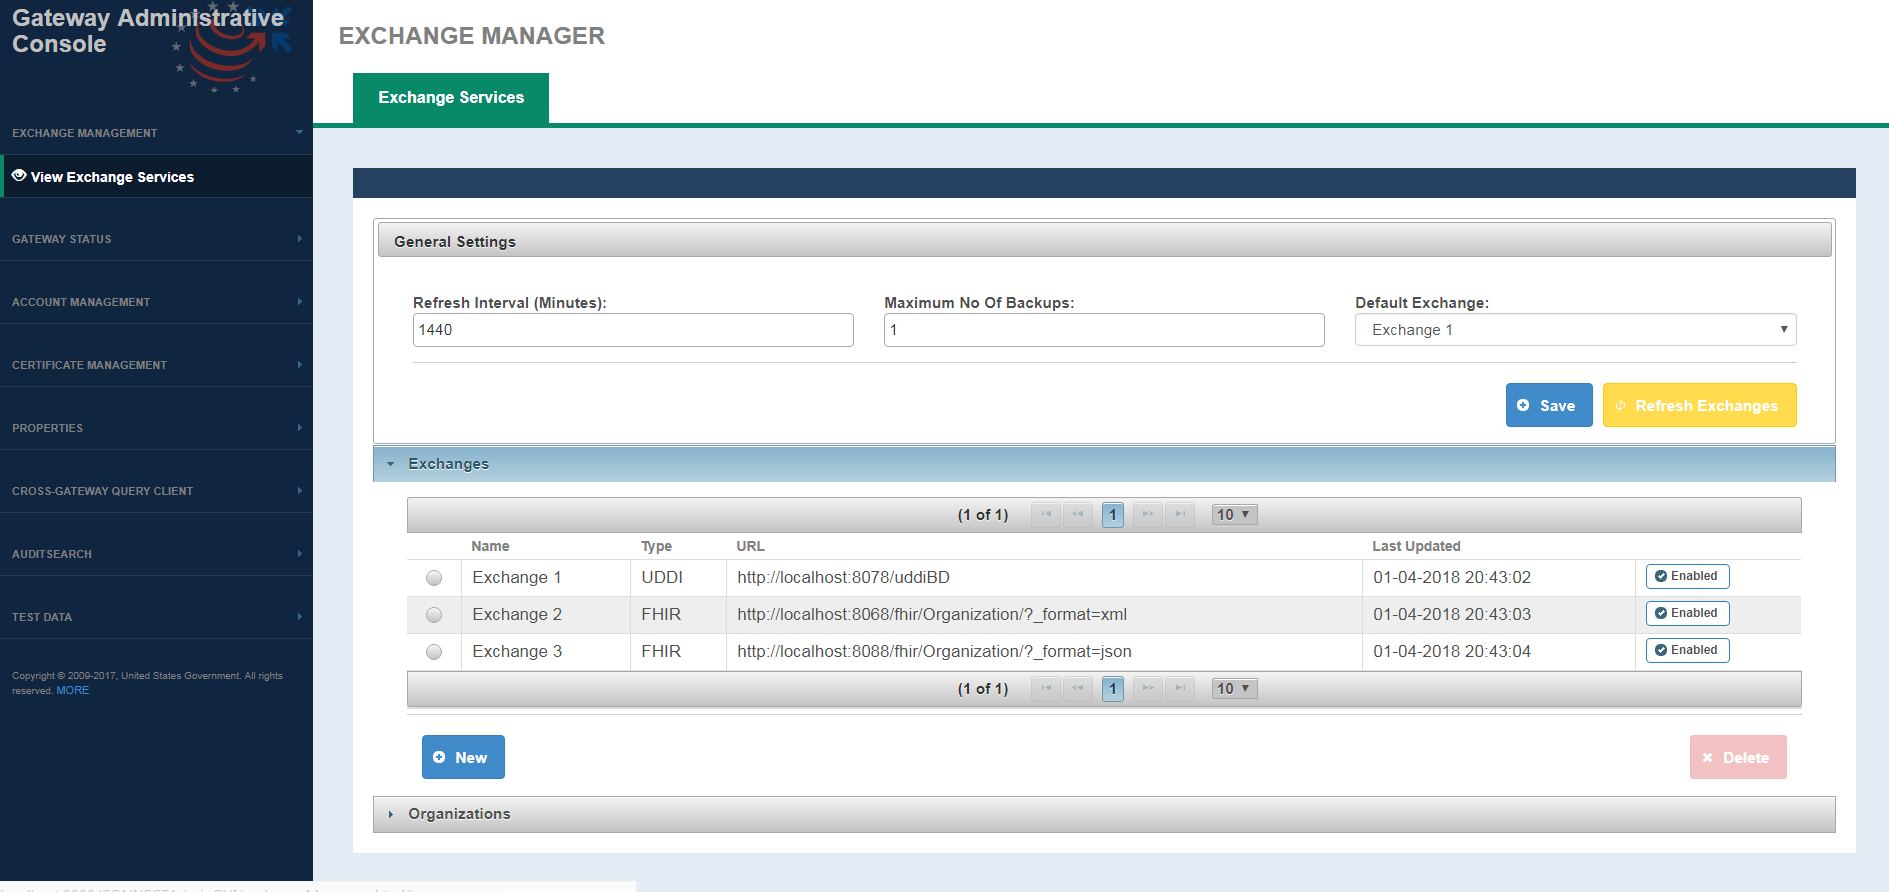
External Connection screen fields
FIELD | DESCRIPTION |
|---|---|
| General Settings | |
| Refresh Interval | Duration used for scheduling the next run of Refresh Exchange process. Expressed in minutes. |
| Maximum No Of Backups | Number of Backups, that the exchange refresh process is allowed to keep at a given time. |
| Default Exchange | A drop down that lists all the available exchanges for user. When selected, it will be used to look up services with a given HCID. If not defined, then the service are looked based on organization HCID only. |
| Exchanges | |
| Name | Name of the Exchange |
| Type | Exchange type is a mandatory element and can have three values only, LOCAL, UDDI, FHIR |
| URL | Used for downloading the web services endpoints. |
| Last Updated | Last Updated displays the timestamp when the exchange was last refreshed |
| Refresh Exchange | A button that Enable/Disable an exchange for refresh. |
| Organizations | |
| Exchange | Single select drop-down that's lists all the exchanges configured in the Exchange Manager configuration file. |
Organization | Single select drop-down that lists all the remote organizations or business entities, for a selected Exchange, configured in the Exchange Manager configuration file. Selecting any business entity updates the business entity fields and the business service fields below to reflect the parameter values for the organization |
Name | Organization Name as defined in the Exchange Manager configuration file for the selected Organization |
Description | Organization description as configured in the Exchange Manager configuration file for the selected Organization |
Contact | Contact name as configured in the Exchange Manager configuration file for the selected Organization |
HCID | Home Community ID as defined in the Exchange Manager configuration file for the selected Organization |
| Service Information | |
| Service Name | Business service Name for the selected Organization |
| URL | Endpoint for the web service |
| Version | Version of the service provided |
| Ping Status | Default is --. Once ping initiated, values are Pass or Fail If ping successful - Pass. If ping is not successful - Fail |
| Last Ping | Timestamp for last ping for the web service |
OPTION | DESCRIPTION |
| Ping Service | Selecting this option after selecting a particular service pings the service. If the ping passed, Ping Status displays Pass If the ping fails, Ping Status displays Fail. A fail could be indicative of some firewall issue, certificate set up issue or some other issue where in the remote service is down During the ping, a "Loading" status window is displayed as the service ping can take some time. Do not try to alter anything on the page during this period or navigate to another page |
| Ping All Services | Clicking on Ping All Services, pings all services for a selected Exchange and Organization. |
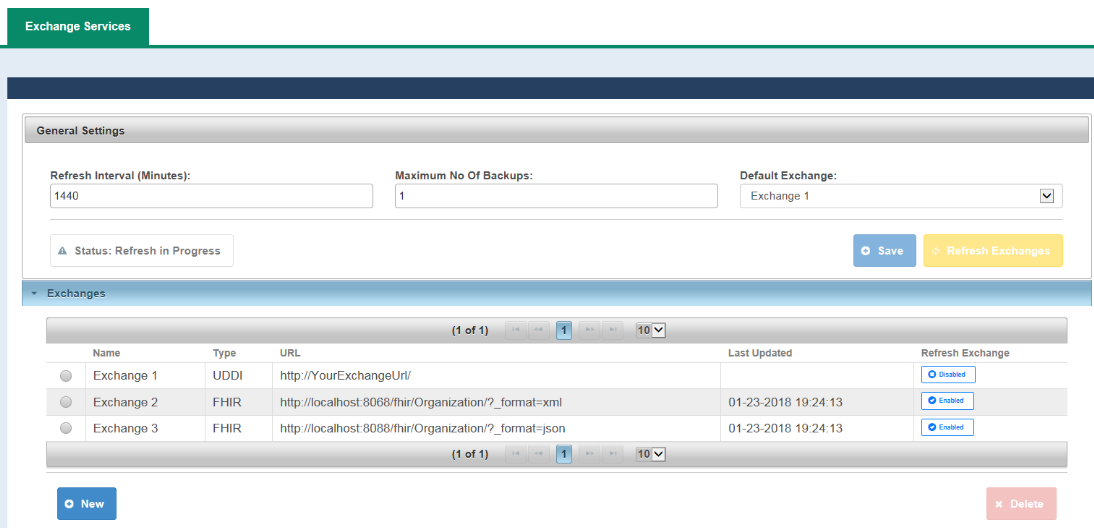
Exchanges Refresh - Schedule, Manual and Locked
The exchanges refresh automatically on the Refresh-Interval and can be force to refresh manually; during Status:Refresh-in-Progress a lock is placed upon the exchange-manager to prevent the modification to ExchangeInfo.xml.
When the Exchange-Manager is Status:Refresh-in-Progress the following functions will be disable:
- Delete
- Save
- Refresh Exchanges
- Enabled
- Disabled
Refresh Exchanges
Clicking on Refresh Exchanges will initiate the Refresh Exchanges process. This will download web services information for all Enabled Exchanges. Below is a screenshot of Exchange Refresh status.
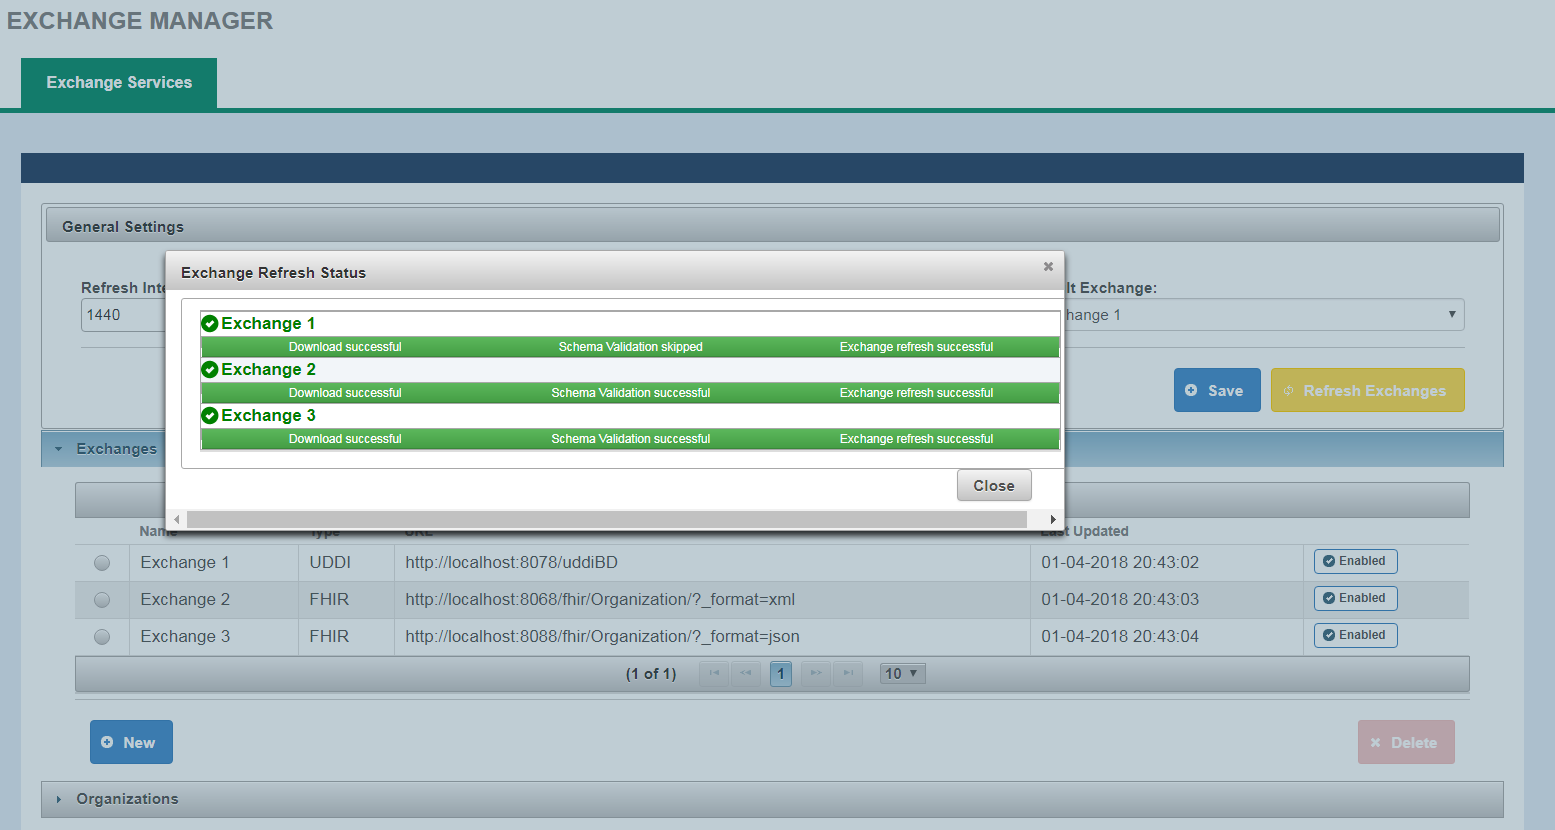
If Refresh Exchange for an exchange is not successful for any reason, the Exchange name will be displayed in Red.
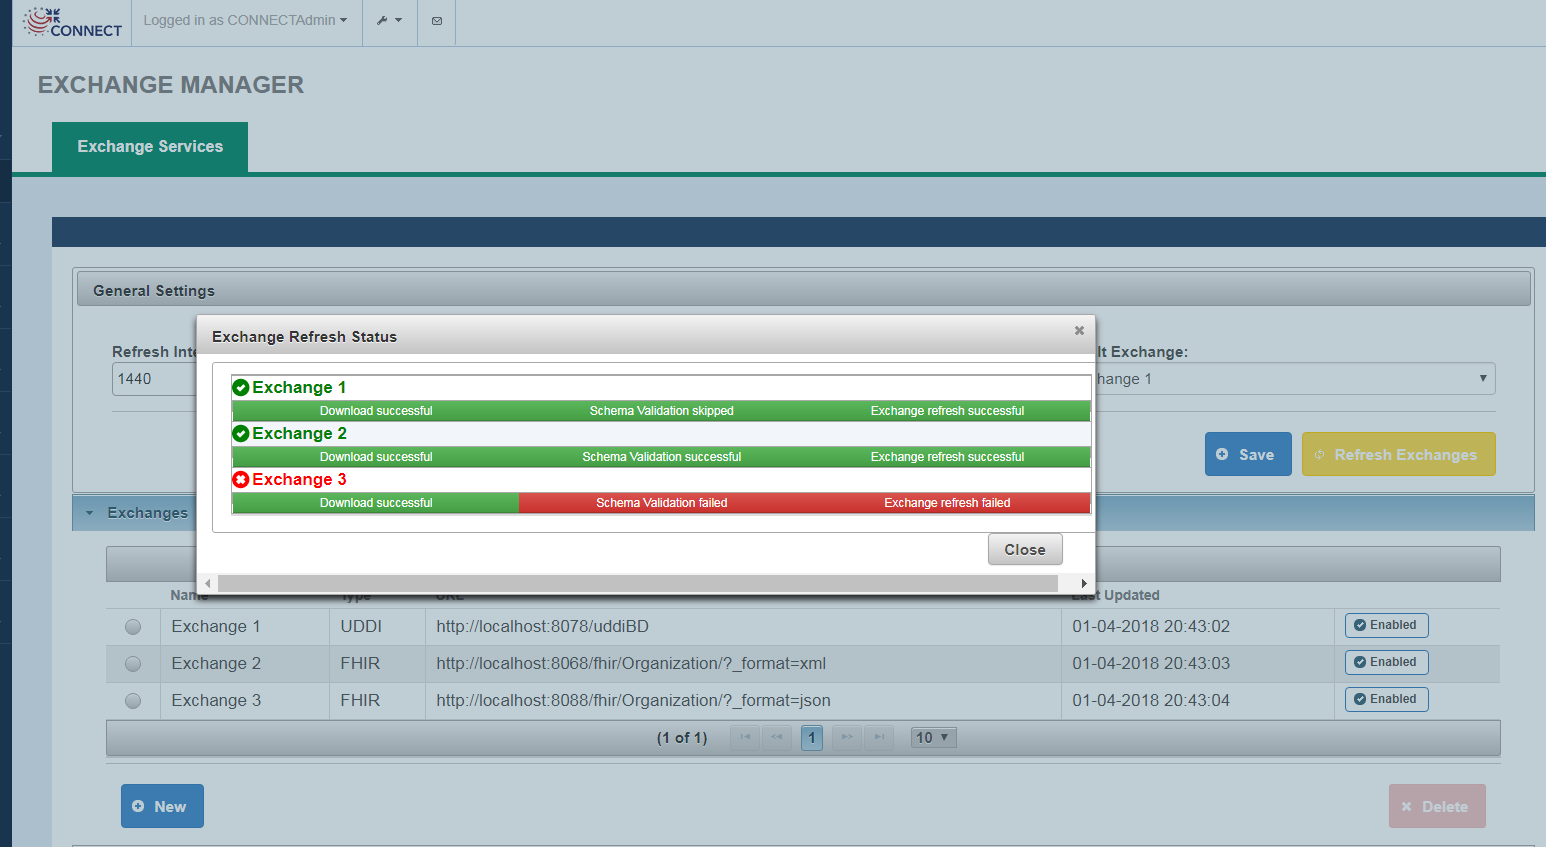
Following is a list of Refresh Exchange Stages and the associated statues displayed on Exchange Refresh Status screen:
| Stage | Success Message | Failure Message |
|---|---|---|
| Downloading from the source exchange | Download Successful | Download failed |
| Validating Schema Compliance | Schema Validation successful, Schema Validation skipped(only for UDDI exchange) | Schema Validation failed |
| Transformation Complete and exchange information is available to CONNECT | Exchange refresh successful | Exchange refresh failed |
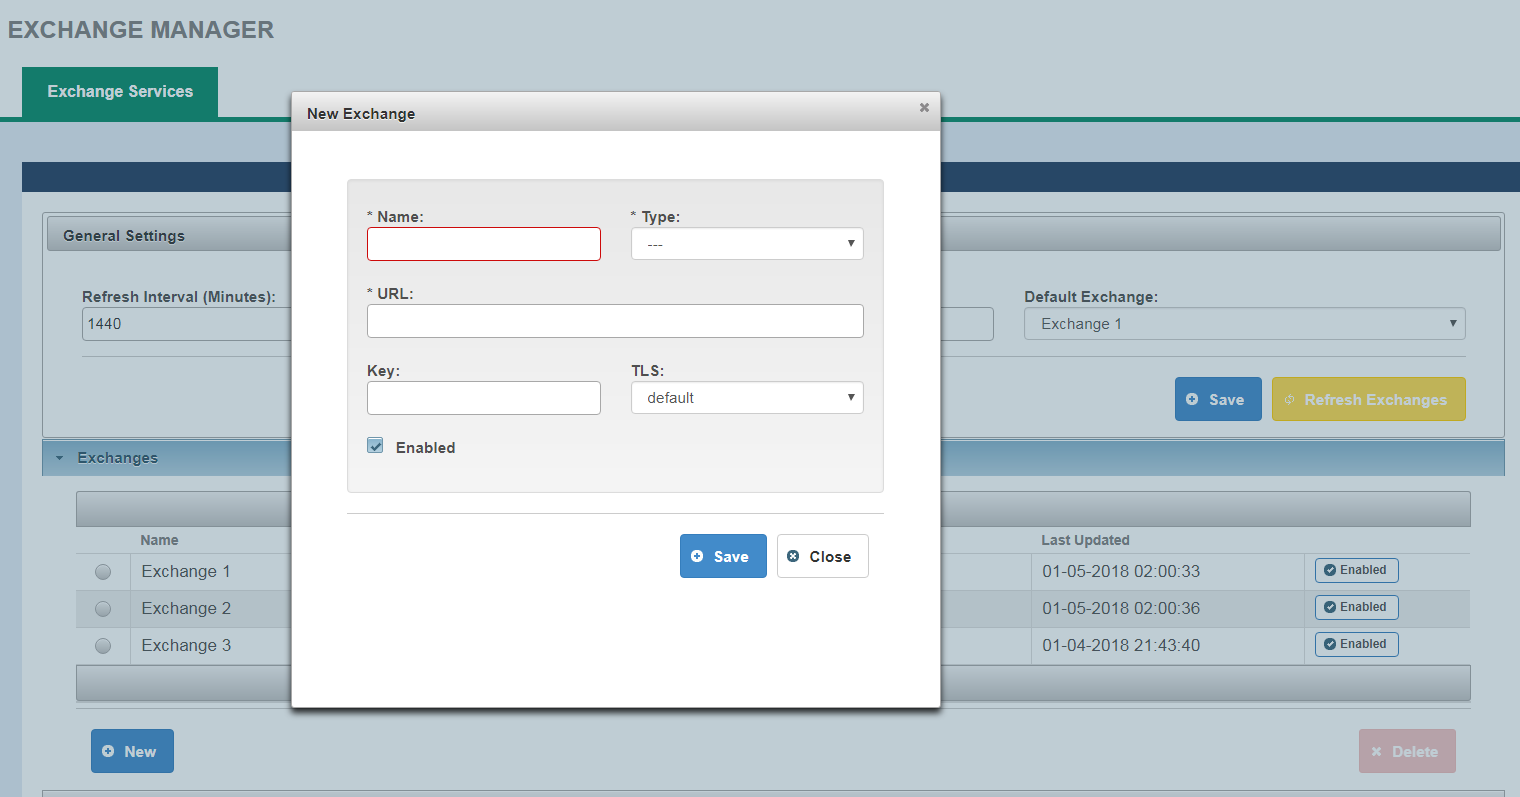
Adding an Exchange
User can add an Exchange by clicking on New button in Exchanges section. Following information is required for adding an exchange:
- Name
- Type
- URL
Deleteing an Exchange
User can delete an Exchange by selecting one from Exchanges list.
Configuration Management
CONNECT provides various property files that manage gateway configuration. Traditionally these property files are manually updated by the system administrators by locating these files deployed at time of installation in the server directory and then editing these files. With the new Configuration Management tool under the Admin GUI, system administrators with limited technical knowledge will be able to update these property files through a GUI interface that both allows them to view the current set of the properties along with descriptions of appropriate values and update them instantly. This simplifies the overall process for the system administrator.
A list of the gateway and adapter properties that are configured in CONNECT can be found here - Gateway properties and Adapter properties
Gateway Properties
Configuration Management -> Gateway Properties screen
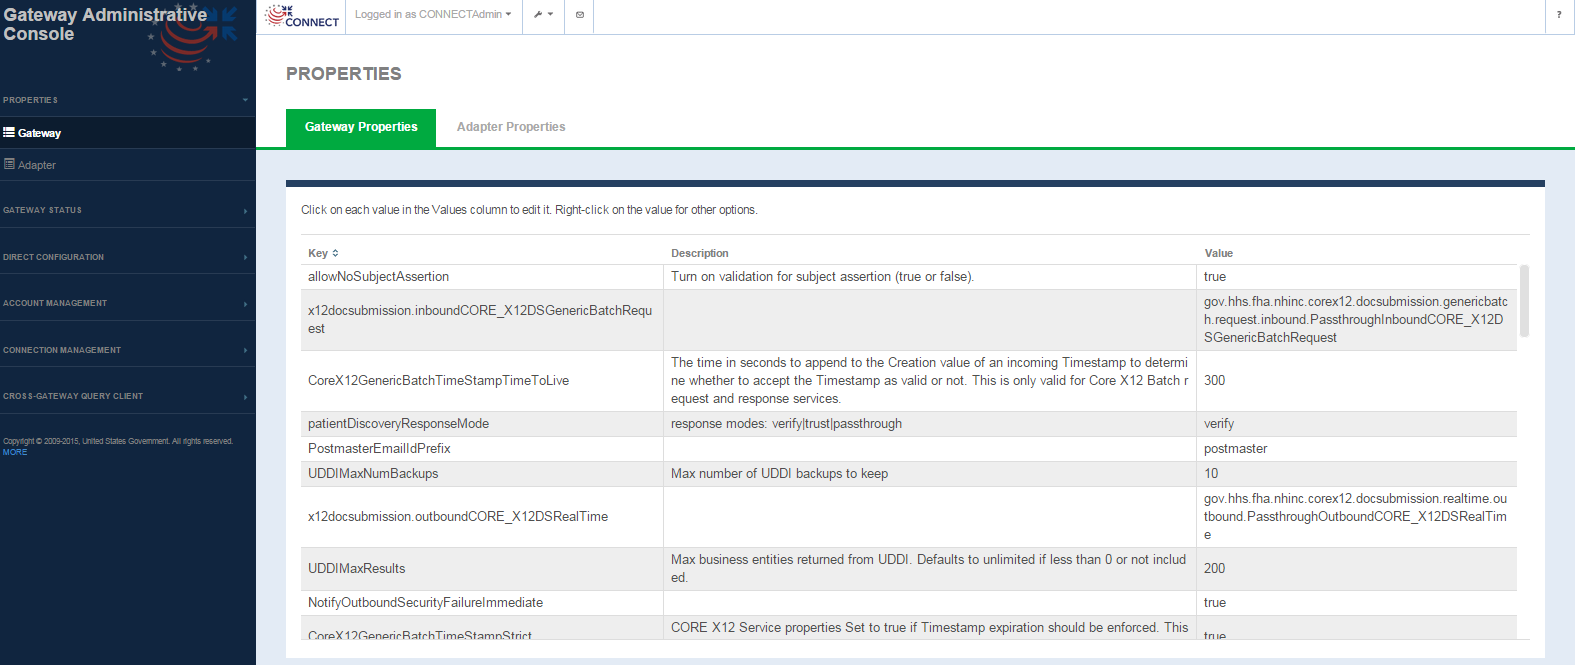
Gateway Properties screen fields
FIELD | DESCRIPTION |
|---|---|
Key | Keys from the gateway.properties file. Not editable. |
| Description | Description of the property, defined as comments in the gateway.properties file Not editable. |
| Value | Property value Selecting the value for any property allows you to edit the value. Once edited the value is updated in the properties file. The user is presented with an alert message as shown below indicating the property is updated
|

Adapter Properties
Properties -> Adapter Properties Screen
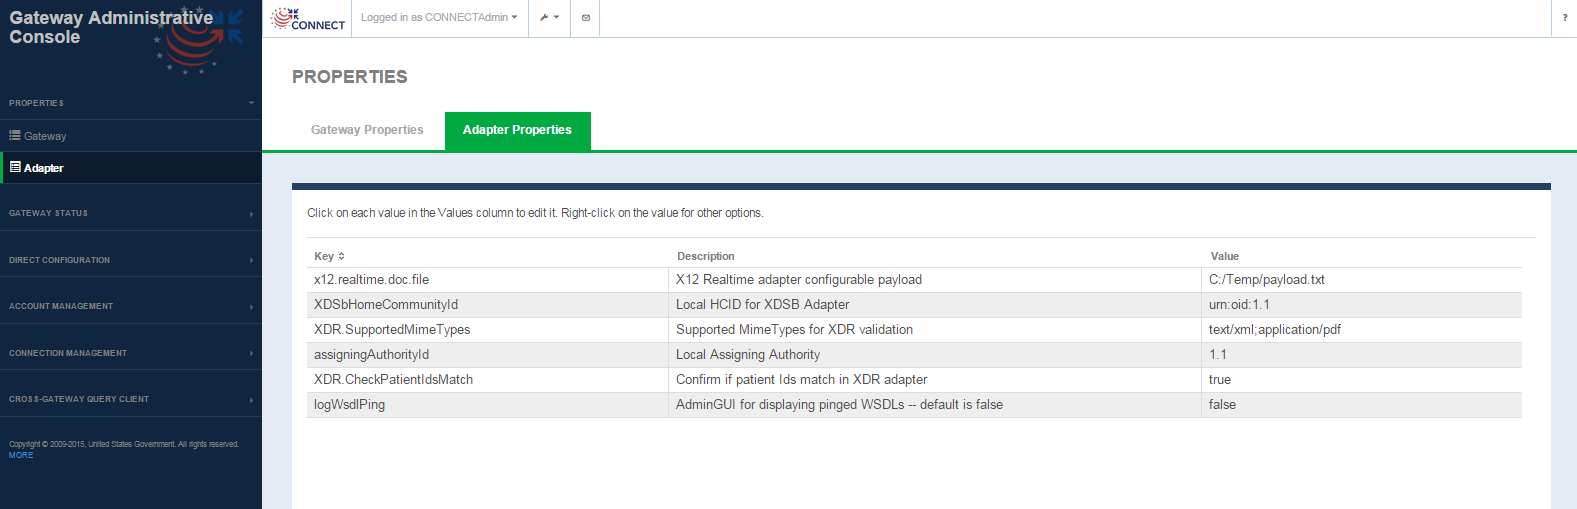
Adapter Properties screen fields
| FIELD | DESCRIPTION |
|---|---|
| Key | Keys from the adapter.properties file. Not editable |
| Description | Description of the property, defined as comments in the adapter.properties file Not editable |
| Value | Property value Selecting the value for any property allows you to edit the value. Once edited the value is updated in the properties file. The user is presented with an Info alert message indicating the property is updated.
|

Audit Properties
Configuration Management -> Audit Properties screen
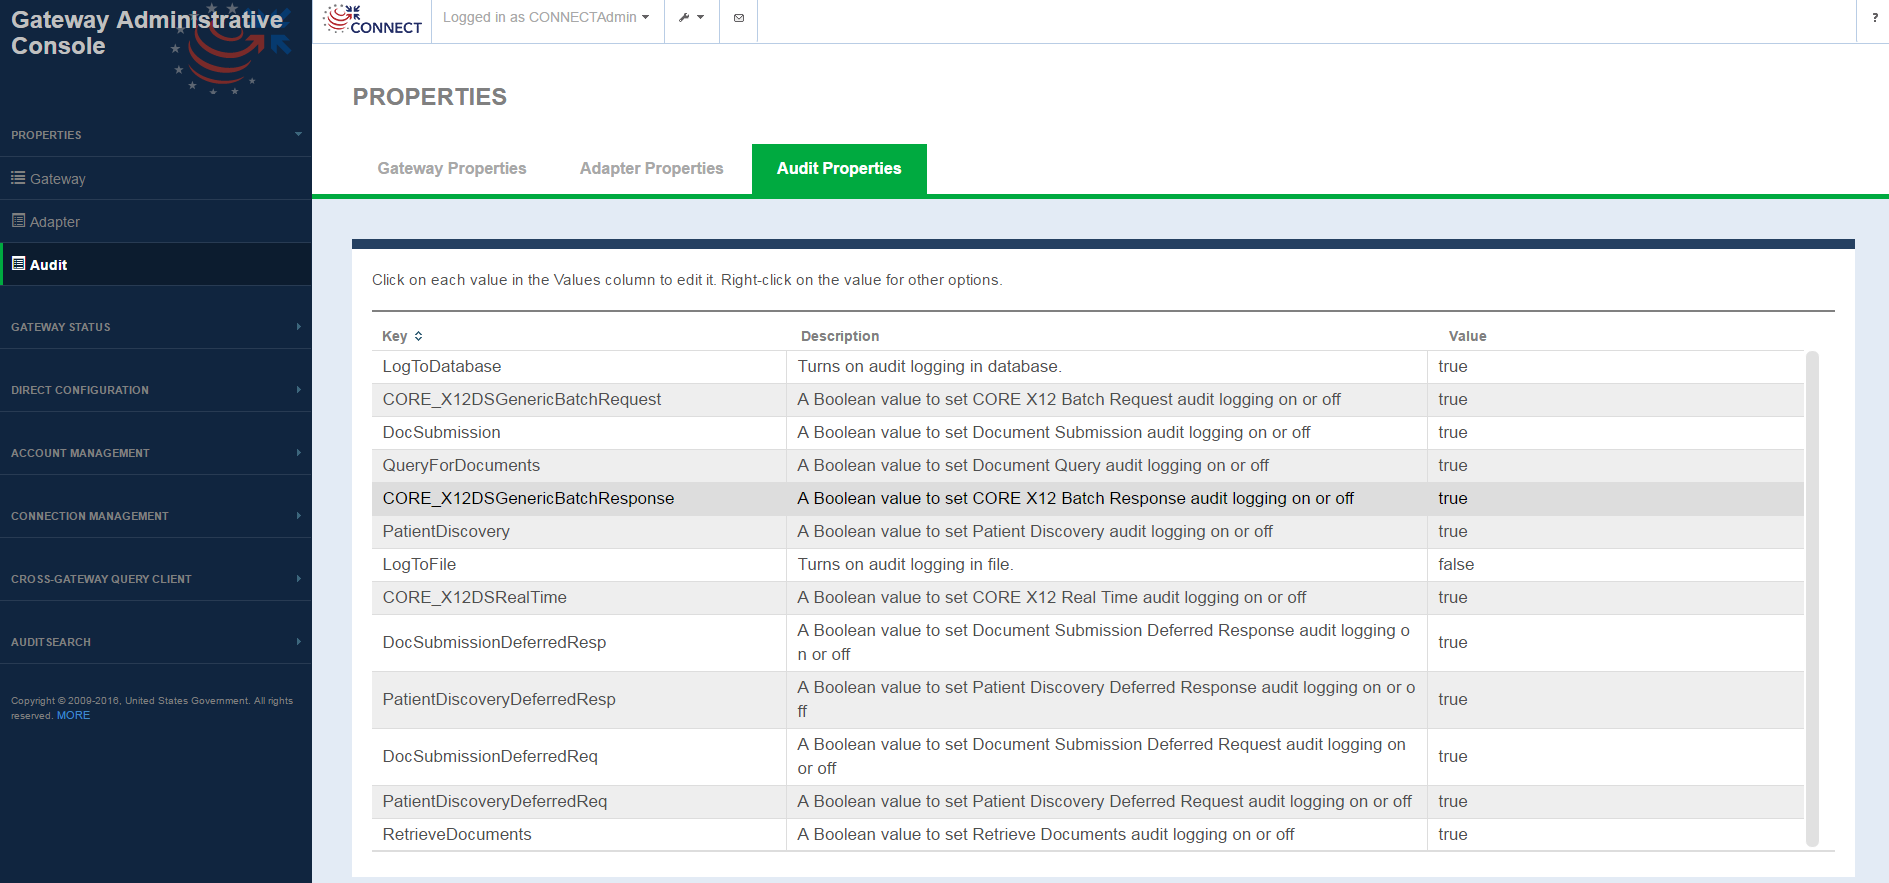
Audit Properties screen fields
| FIELD | DESCRIPTION |
|---|---|
| Key | Keys from the audit.properties file. Not editable |
| Description | Description of the property, defined as comments in the audit.properties file Not editable |
| Value | Property value Selecting the value for any property allows you to edit the value. Once edited the value is updated in the properties file. The user is presented with an Info alert message indicating the property is updated.
|

Internal Endpoints
This interface allows system administrators to edit internal web-services hosted by CONNECT.

Internal Endpoints Properties screen fields
| FIELD | DESCRIPTION |
|---|---|
| Name | CONNECT internal web service name. |
| Version | web service version |
| URL | endpoint where the web service is hosted. Selecting the URL for any service allows you to edit the endpoint. Once edited the updated URL is saved to internalExchangeInfo.xml file. The user is presented with an Info alert message indicating the property is updated.
|

Cross-Gateway Query Client
The Cross-Gateway Query Client is a testing tool that is used to validate and test data exchange services like Patient Discovery, Query for Documents and Retrieve Documents. The client allows the system administrator to run preliminary tests to ensure that a particular remote gateway is up and running and can respond to service requests. The client tool allows the users to search for patients in a targeted remote community and retrieve documents.
Not intended for exchange certification testing
Please note that test client should not be used for actual certification testing on any exchange. In addition, this requires a gateway to gateway setup. See the initiating and responding gateway setup instructions for pass by reference testing for an example if you are unfamiliar with this process. Using this client in loopback mode is also possible but requires additional re-configurations.
Search patient
The Patient Search tab is the default tab on this screen which allows the user to search patients by demographics.
Patient Search Screen
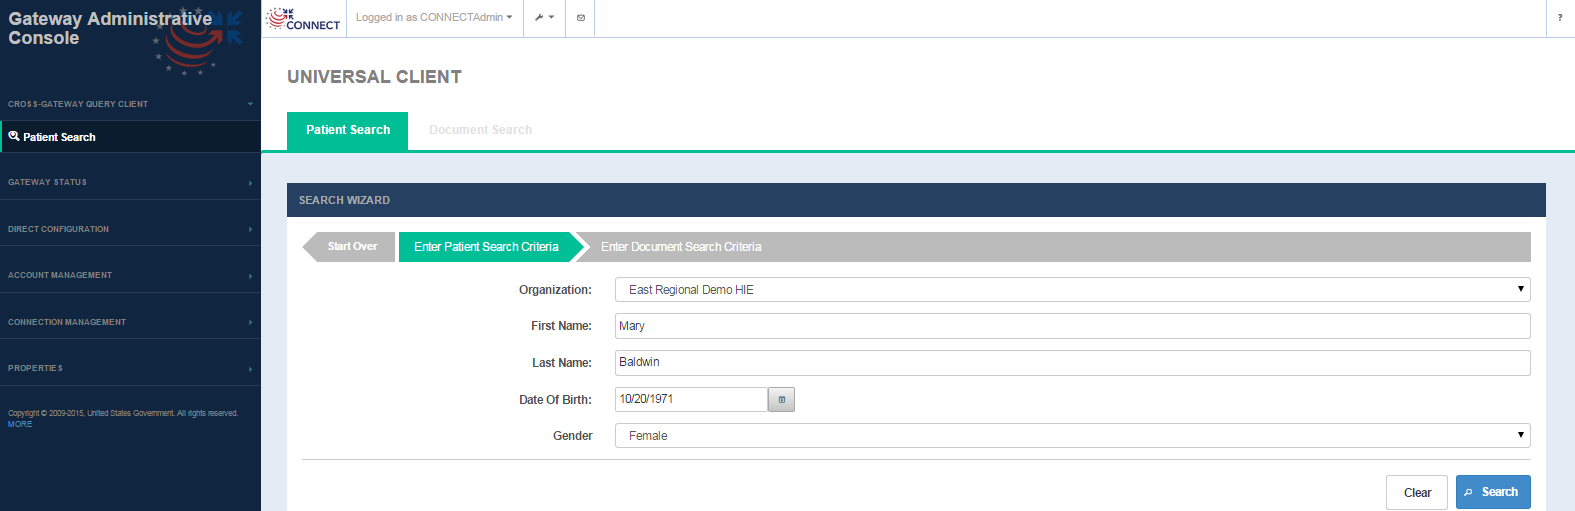
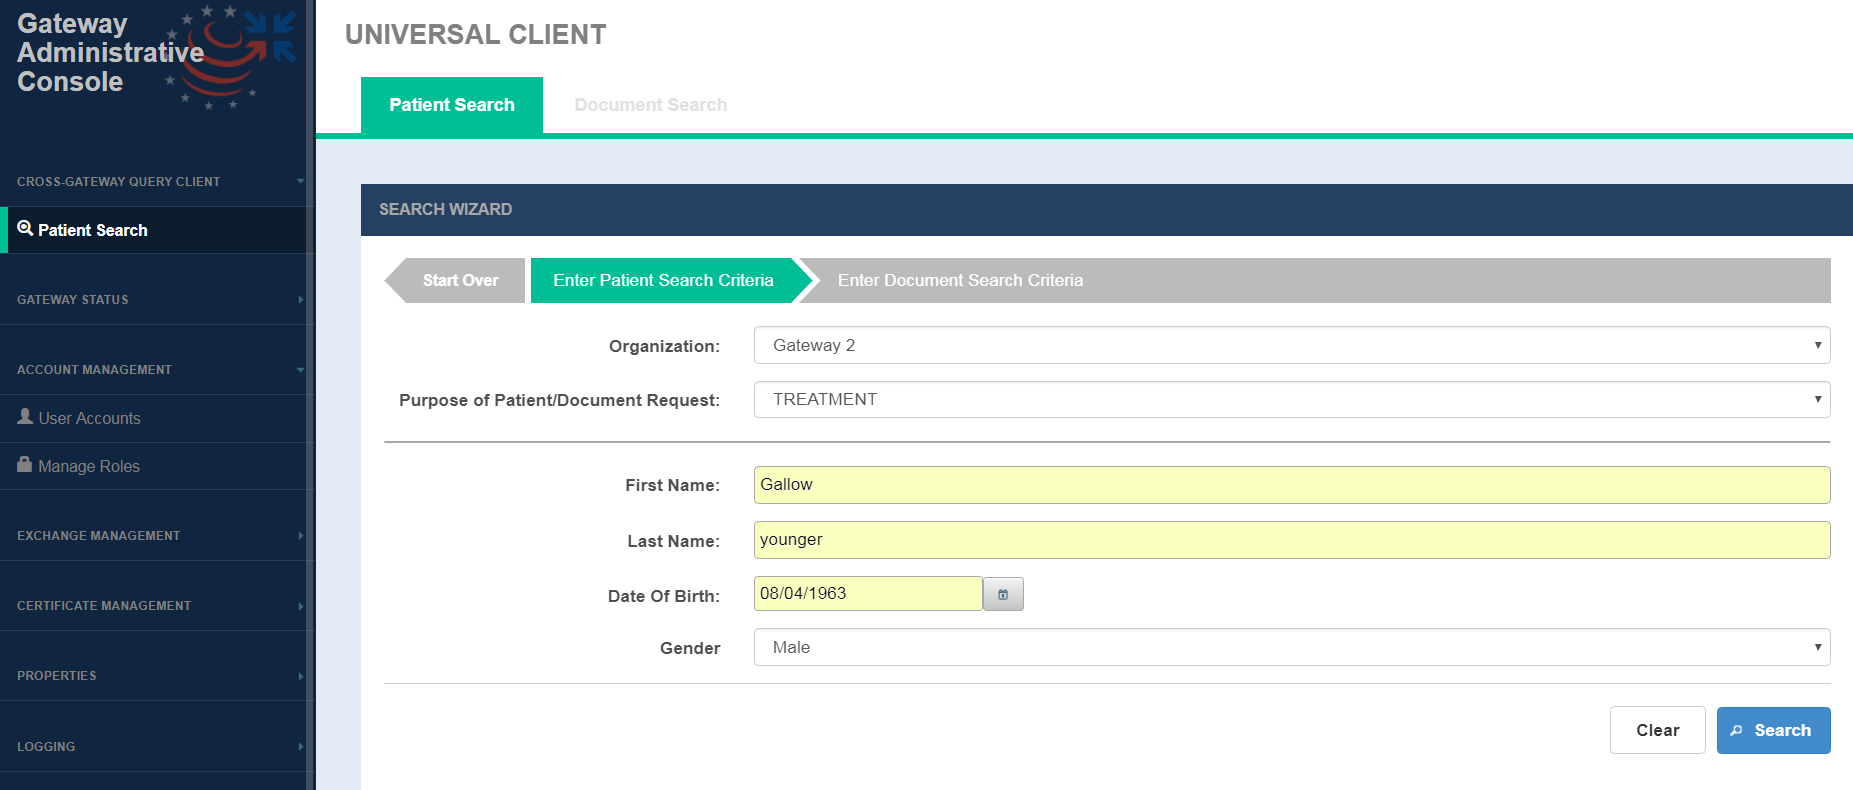
Patient Search screen fields
FIELD | DESCRIPTION |
|---|---|
Organization | Single select drop-down that lists all the remote organizations or business entities configured in the Exchange Manager configuration file |
| Purpose of Patient/Document Request | From CONNECT 5.2, this feature is available. A drop-down list used to populate assertion-->userInfo→ roleCoded element in the Entity Request. |
First Name | First name of the person being searched (Required) |
Last Name | Last name of the person being searched (Required) |
Date of Birth | Date of birth of the person being searched (Required) |
Gender | Single select drop-down for gender of the person being searched (Required) |
OPTION | DESCRIPTION |
Search | Selecting the option triggers a patient discovery (PD) request targeted to the remote community identified in the Organization field.
Patient search results table is displayed when patients are returned in the PD response.(See Fig 25) If no patients are returned, the user is presented with a message ' Patient Not Found' |
Clear | Selecting this option removes all the data that has been entered on the screen so that the search fields can be entered in again. |
Patient Search Results
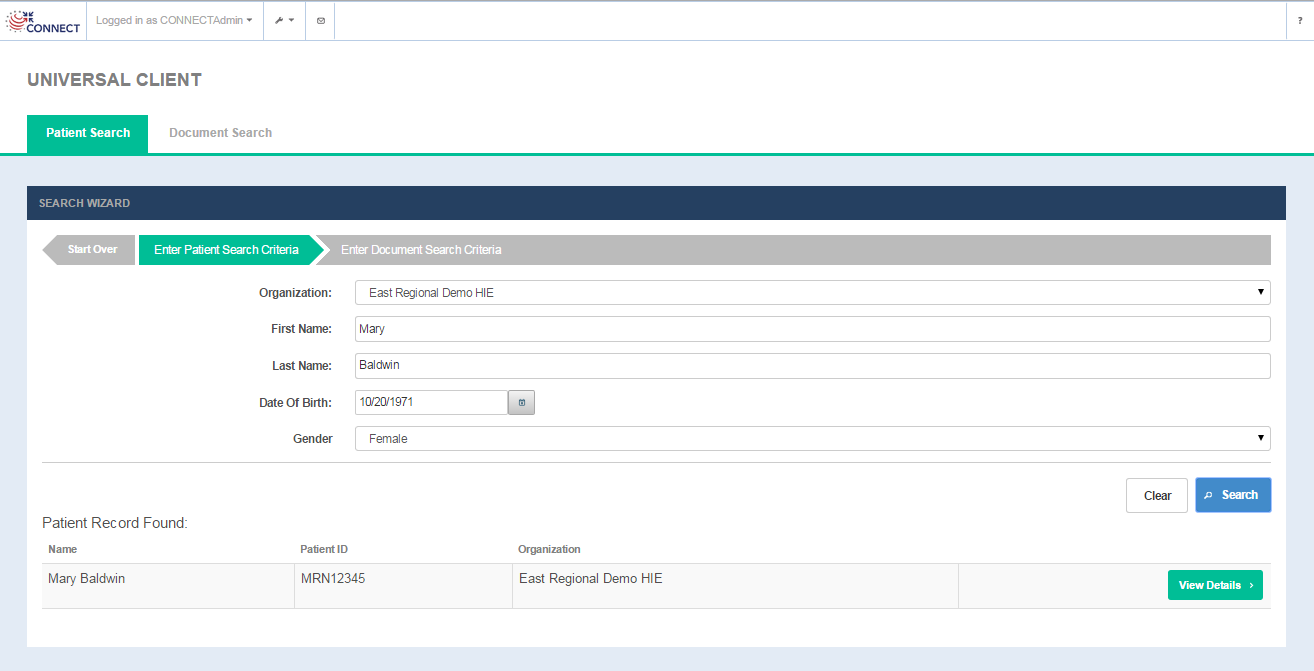
Patient Search results fields
COLUMN | DESCRIPTION |
|---|---|
Name | Name of the person being searched |
Patient ID | Patient ID from the remote community |
Organization | Remote community name(as defined in the Exchange Manager configuration file) |
OPTION | DESCRIPTION |
View Details | Selecting the option opens the Document Search tab allowing the user to enter in document search criteria. |
Search/View documents
Selecting the View Details option on the Patient Search screen opens up the Document Search screen where the user can enter in search criteria for the documents. The screen displays the Current Patient Details from the PD response and provides the ability to search documents by document type and creation date ranges.
Document Search screen
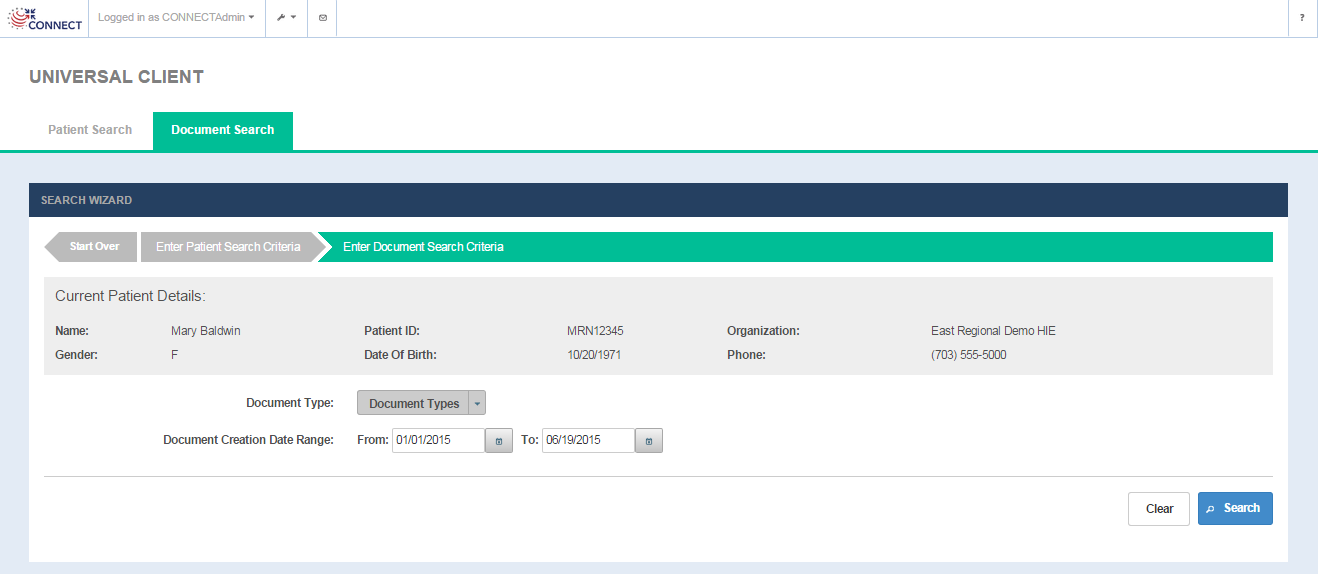
Document Search screen fields
FIELD | DESCRIPTION |
|---|---|
| Current Patient Details: | |
Name | First name and last name of the of the patient |
Patient ID | Patient ID from the remote community |
Organization | Remote community name(as defined in the Exchange Manager configuration file) |
Gender | Patient gender |
Date of Birth | Patient date of birth |
| Phone | Patient phone |
| Document Search Criteria: | |
| Document Type (optional) | Multiple select options for document types to be searched for the patient(Optional). Available document types are loaded from the <nhinc.properties.dir>/documentTypes.properties property file. Based on the use cases, the adopter can configure this file with the supported document types for their implementation. |
| Document Creation Date Range (optional) | From and To Times for Document Creation Date. A creation specifies the date a document was created and stored electronically - not necessarily the date of a patient's visit. |
OPTION | DESCRIPTION |
Search | Selecting the option triggers a query for documents (QD) request targeted to the remote community.
Document search results table is displayed for the documents returned in the QD response.(Fig 27) If no documents are returned, the user is presented with a message ' No Documents Found' |
Clear | Selecting this option removes all the data that has been entered on the screen so that the search fields can be entered in again. |
Document Query Results
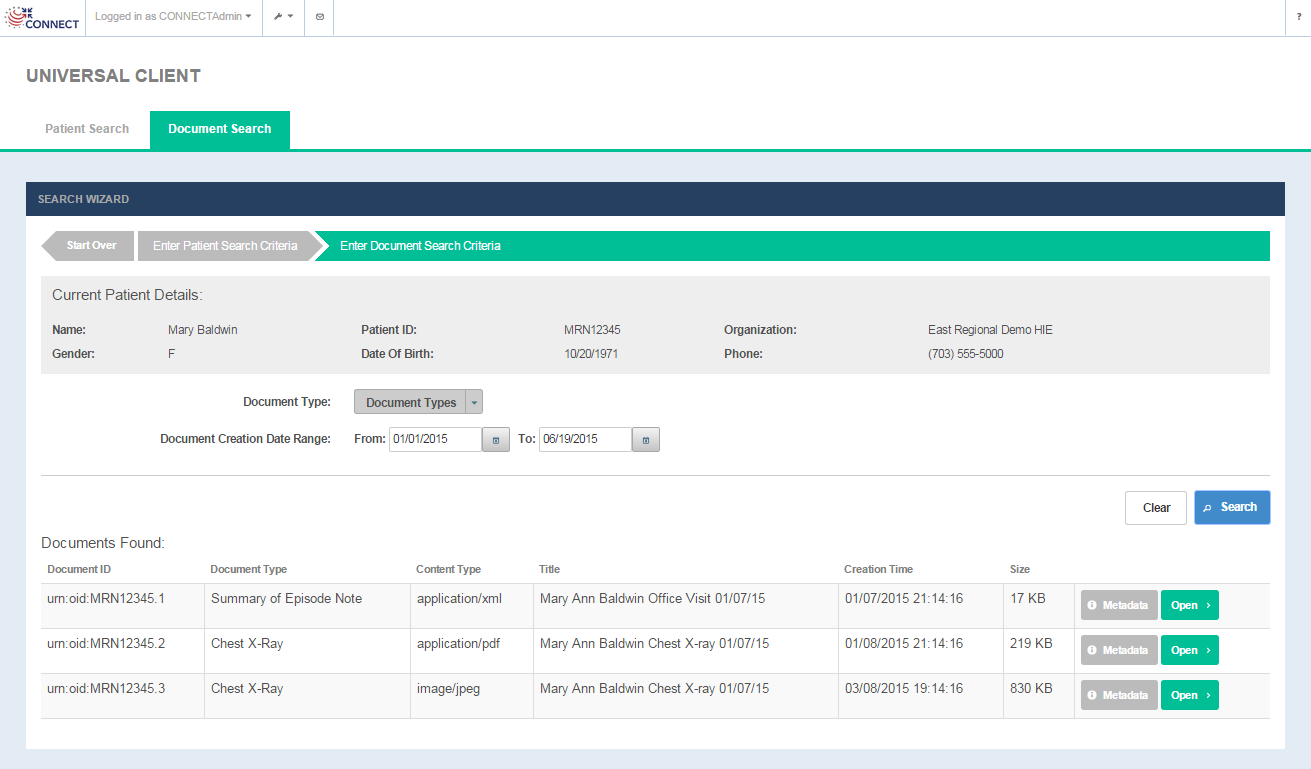
Document Query results
COLUMN | DESCRIPTION |
|---|---|
| Document ID | Unique document ID metadata value associated with the document |
| Document Type | Document Entry Type Code description associated with the document |
Content Type | Mime Type metadata value associated with the document |
Title | Title metadata value associated with the document |
Creation Tine | Creation Time metadata value associated with the document |
| Size | Size metadata value associated with the document |
OPTION | DESCRIPTION |
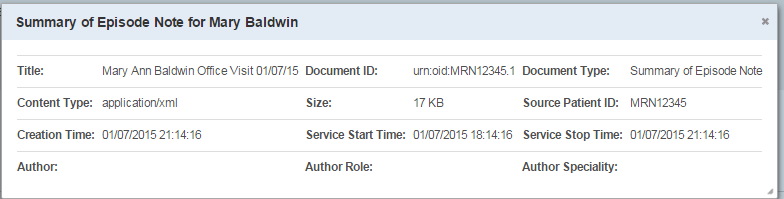
Metadata | Selecting the option opens up a metadata modal window that displays the document metadata associated with the document.(Fig 28). The Document metadata page lists some key metadata values associated with the Document Entry returned in the query response |
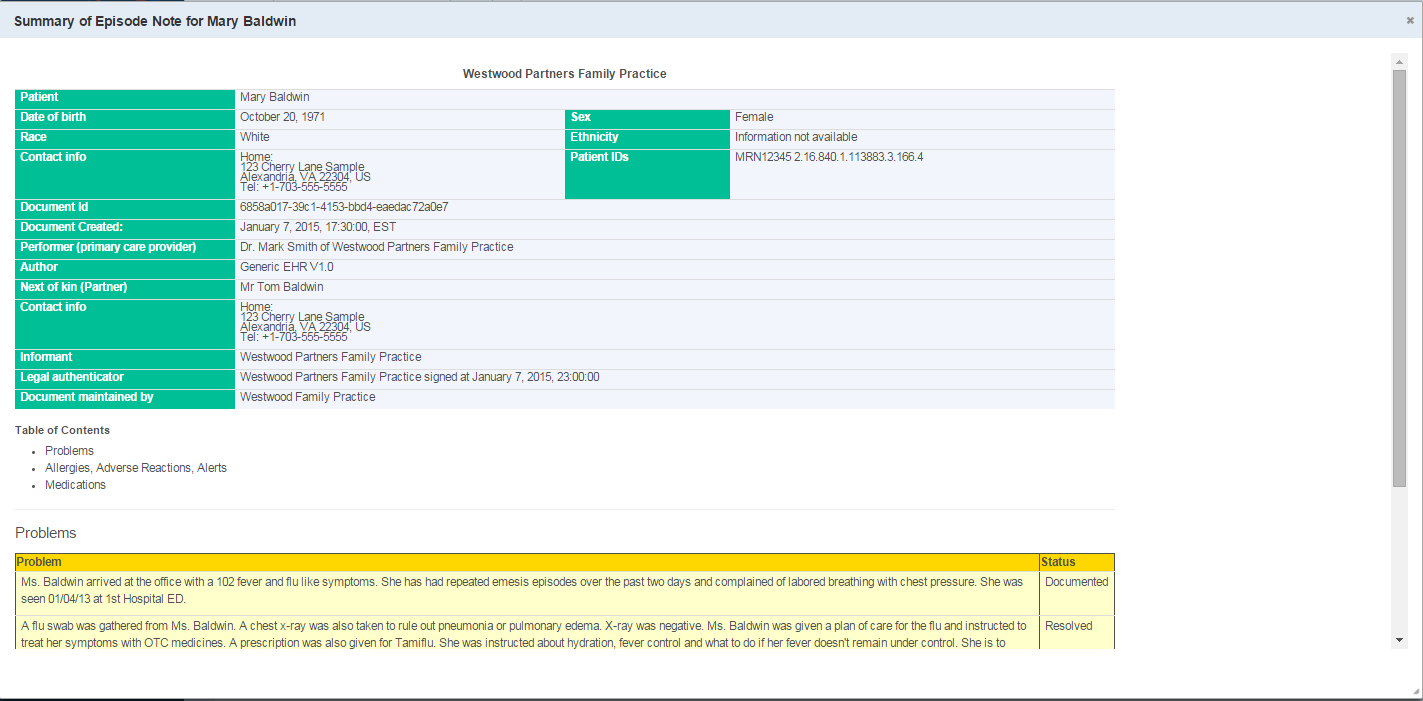
| Open | Selecting the option triggers a Retrieve document (RD) request to the remote community and displays the document in a modal window (Fig 29) For CDA document, a style sheet is used to render the document in html form |
| Start Over | Selecting this option on the screen will allow the user to start a new patient search |
View Document Metadata
View Document
Logging
User can search Audit and Failure events through Logging GUI.
Audit Search
Audit search is a tool to view and search/filter audit logging events from the Admin GUI without logging into database to track events. Adopters can take advantage of the Audit Search from the System Administrative Module if they choose the Database Audit Logging Implementation.
The audit search on this screen which allows the user to search audit events by providing Audit query parameters.
Audit Search Screen

Audit Search screen fields
FIELD | DESCRIPTION |
|---|---|
Start Time | Start time of Event transaction. Start time specifies begin transaction time. (optional) |
End Time | End time of Event transaction. User can view status of transactions performed over the period by choosing Start time and End time. (optional) |
Requester/User | Name of the user that initiated the transaction. (Ex: kskagerb or CN=localhost) optional) |
Service | Service name for NwHIN transactions. (Ex: PatientDiscovery, DocumentQuery ) (optional) |
Organization | Single select drop-down that lists all the remote organizations or business entities configured in the Exchange Manager configuration file. (optional) |
| Message ID | It is the request messageId of Synchronous services and Deferred Request services. (optional) |
| Relates To | RelatesTo is the messageId of original Deferred request message.(optional) |
OPTION | DESCRIPTION |
Search | Selecting the option triggers audit search based on the search parameters provided. Audit search results table is displayed when audit records found.(See Fig 31). If no search criteria entered, then all the available audit transactions will be displayed. If no Audit transaction rows are returned, the user is presented with a message ' Audit Records not Found' |
Reset | Selecting this option removes all the data that has been entered on the screen so that the search fields can be entered in again. |
Audit Search Results
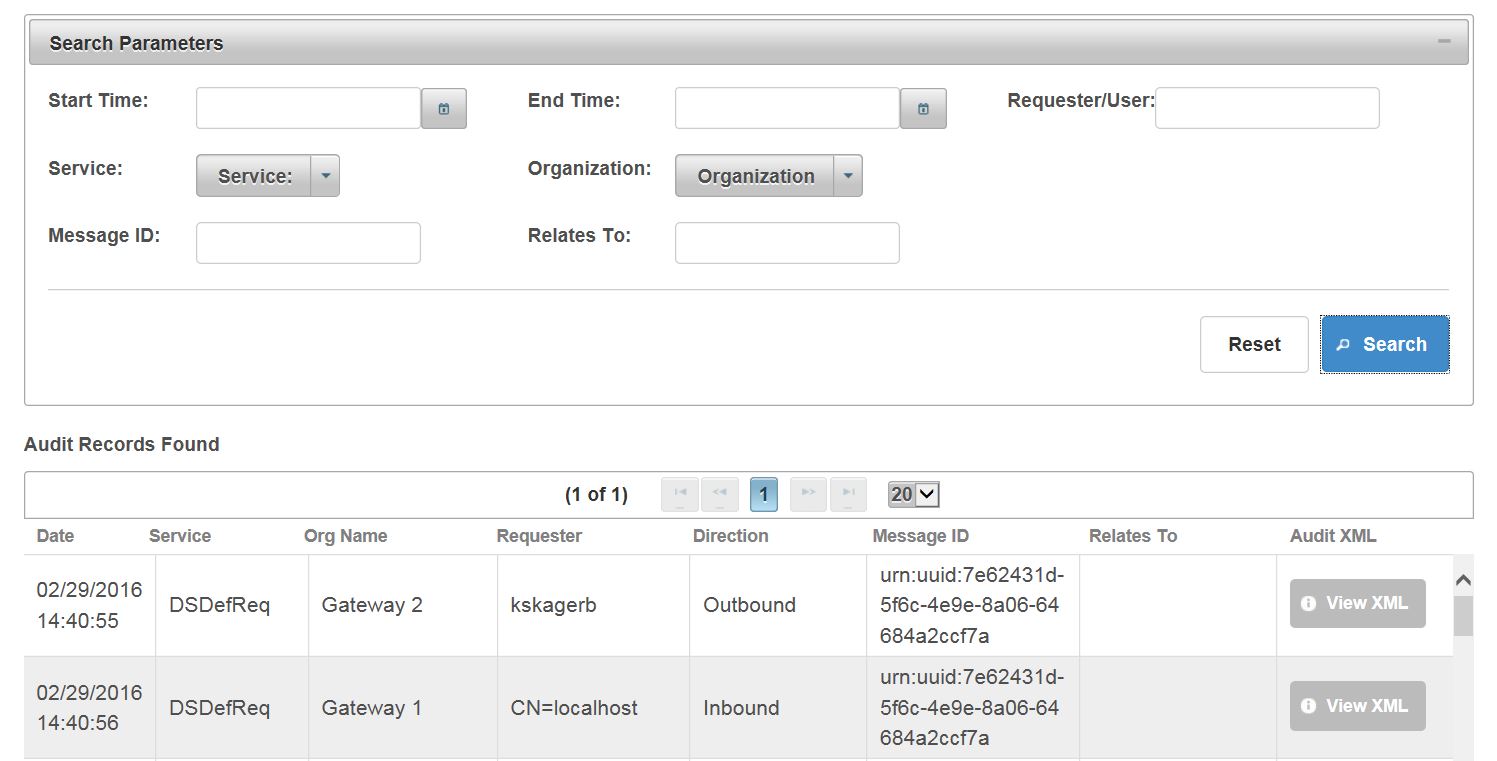
Audit Search Results
COLUMN | DESCRIPTION |
|---|---|
| Date | Date and time when the audit transaction performed. |
| Service | Service name of the NwHIN transaction. (Ex: PD,PDDefReq,PDDefResp,QD,RD,DS,DSDefReq,DSDefResp,AD,X12RealTime..) |
Org Name | Name of the organization that performed the audit transaction. The value locates from Exchange Manager Configuration under "businessEntity>name" |
Requester | User that initiated the transaction. |
Direction | Audit direction related to that particular transaction. (Ex: Inbound, Outbound) |
| Message ID | Request messageId of Synchronous services and Deferred Request services. |
| Relates To | RelatesTo is the messageId of original Deferred request message. |
OPTION | DESCRIPTION |
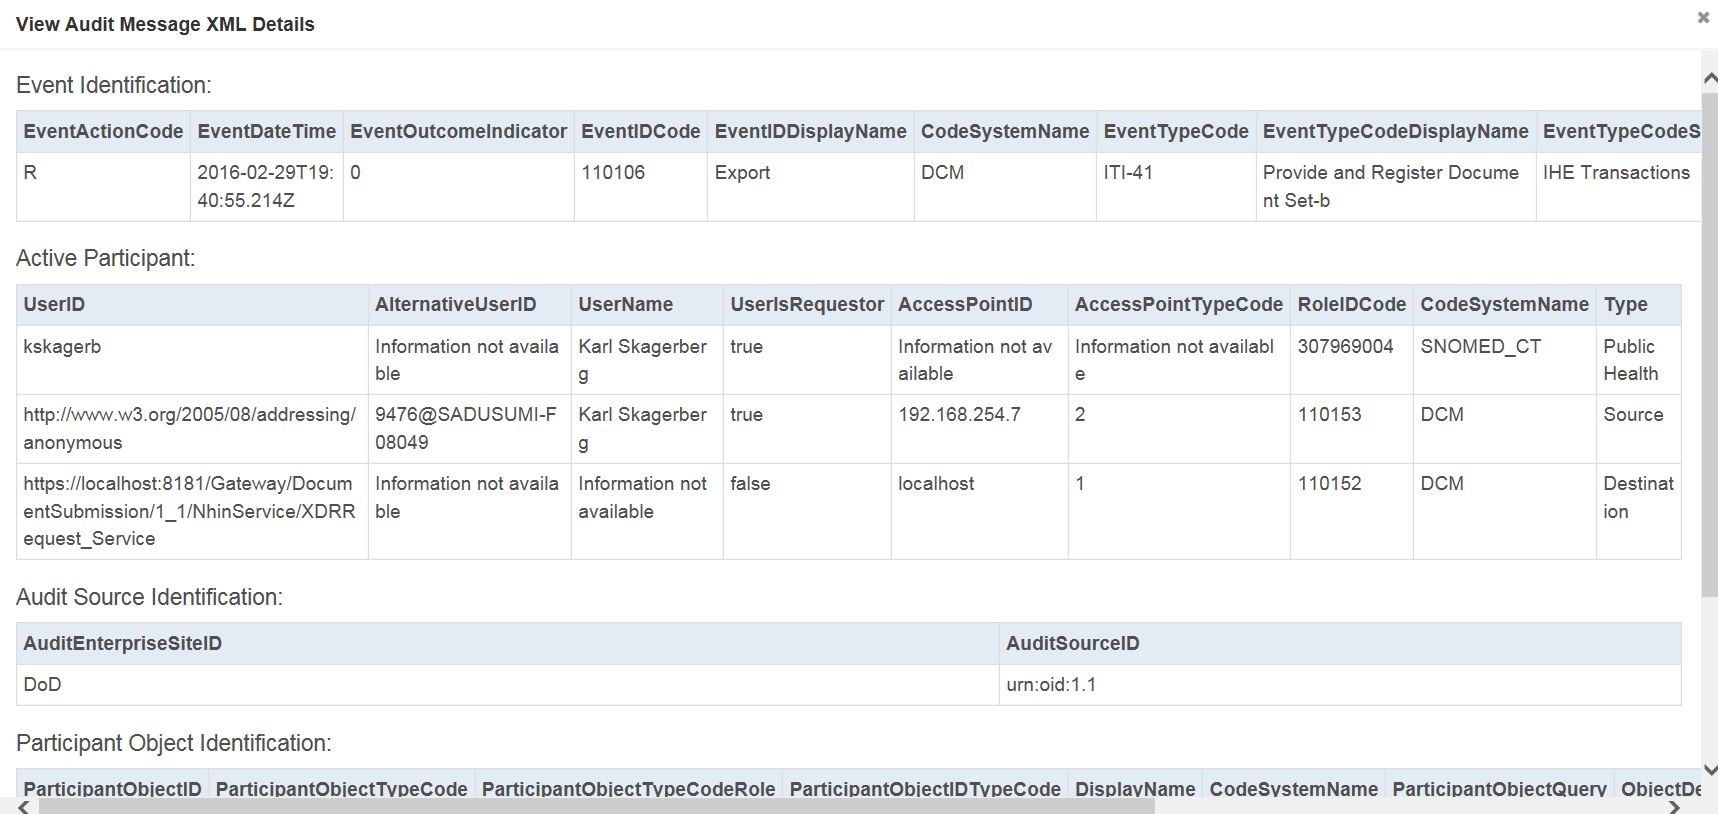
View XML | Selecting the option opens up a child modal window that displays audit blob message xml details associated with the transaction.(Fig 32). For Audit Blob xml message, a style sheet is used to show the details in html format. |
View Audit Message XML details:
Failure Logging
The failure logging screen allows user to search for a failure event in a service workflow. The user may then view the details of a given error event to learn more about the cause of the service failure.
Failure Logging Screen
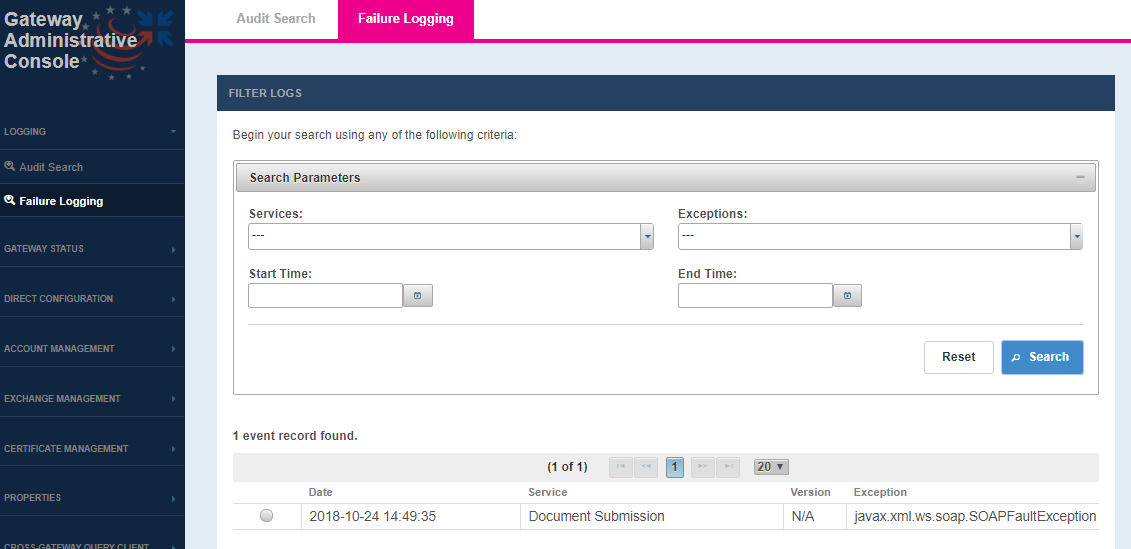
FIELD | DESCRIPTION |
|---|---|
Services (optional) | The service to filter results by |
Exception (optional) | The exception type that was thrown by the service |
Start Time (optional) | filter events that are on or after Start Time |
End Time (optional) | filter events that are on or before End Time |
OPTION | DESCRIPTION |
Search | Search based on the Options parameter or return all the exceptions from events if no filter is provided. Search results table is displayed when event record found. If no event records are returned, the user is presented with a message '0 event records found.' |
Reset | Clears the search parameters. |
Failure Logging – Search Results
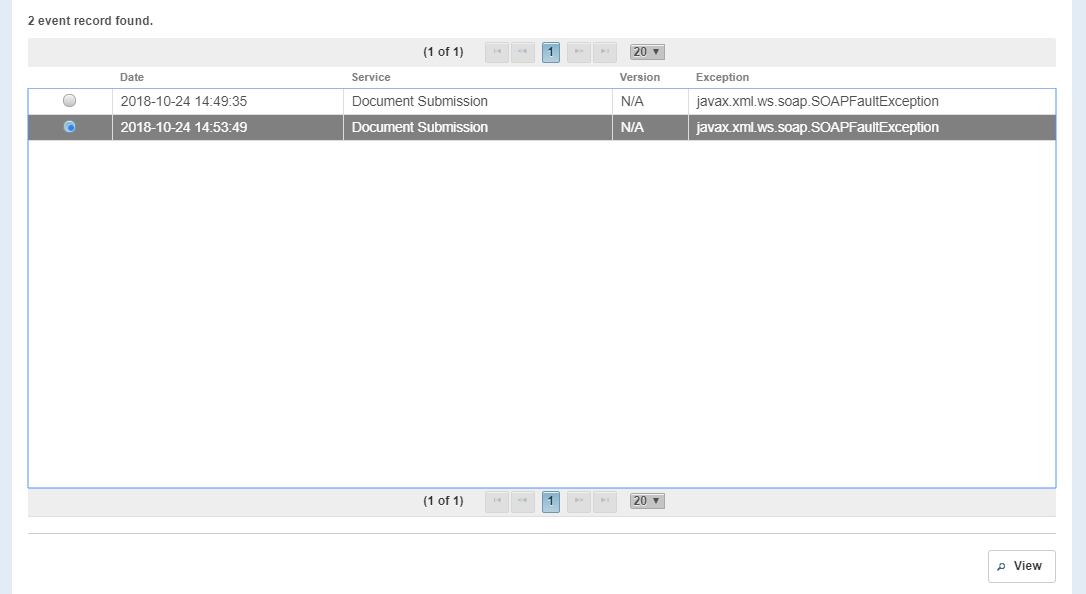
COLUMN | DESCRIPTION |
|---|---|
| Date | Date and time of when the exception was caught. |
| Service | Service name of the NwHIN transaction. |
Version | Service Version (If provided by the service, otherwise "N/A") |
Exception | The java exception that was thrown |
OPTION | DESCRIPTION |
View | View full detail description of the error event. |
Error Event – full technical details
This view will show various details about the Error Event, such as the time in which the exception was caught, the exception message, the class and method that the failure occurred in, as well as the exception thrown accompanied by the full stack trace.
